Table of contents
Project 1 - ETL Flat Files to MSSQL
This project is a small version of a real-time project often used in the banking and insurance sectors. Here, data is received from different sources as flat files (like .csv or .xml). In banking, this file is sometimes called a control file. The file may come from Dynamics 365,right-fax servers, through web services, etc. This data needs to be ingested into SQL Server. The data comes from various branches or field offices throughout the day, and the workflow needs to run at a regular time each day to process all the files.
This kind of ETL is best suited for handling large volumes of data in batch mode, such as end-of-day processing for banks etc.
Project Overview
- Data Source: A folder containing .csv files with the following data:
policy_number,policyholder_name,insured_name,policy_type,effective_date,expiration_date,premium_amount,beneficiary_name,beneficiary_contact,agent_name,agent_contact,coverage_details,endorsements_riders,underwriter_name 0_1722756562687,Pamela Bennett,Steven Dunn,Home,2021-08-24,2021-02-03,83572,Dana Hampton,366-752-7514x4594,Troy Young,+1-818-775-4416x2930,Set like go entire ground.,Drive generation major.,Candice Williams -
File Naming Convention: The CSV file names will be in the format
policy_issuance_file_x.csvwhere x is 1, 2, 3… -
SSIS Workflow: The workflow will contain a Foreach Loop container. Inside the Foreach Loop, there will be a Data Flow Task. The Data Flow Task will contain: Flat File Source -> Data Conversion -> OLE DB Destination.
- Setup Required: You can develop this easily on a Windows machine. You will need MSSQL server. Visual Studio(Community edition will do). SSDT(to create the SSIS package in VS).
Step 1: Create the Required Database in MSSQL
Open SQL Server Management Studio (SSMS) and run the following SQL script to create the database and table.
-- Create the database
CREATE DATABASE InsuranceDB;
GO

-- Use the newly created database
USE InsuranceDB;
GO

-- Create the table
CREATE TABLE PolicyIssuance (
    policy_number NVARCHAR(50) PRIMARY KEY,
    policyholder_name NVARCHAR(100),
    insured_name NVARCHAR(100),
    policy_type NVARCHAR(50),
    effective_date DATE,
    expiration_date DATE,
    premium_amount DECIMAL(10, 2),
    beneficiary_name NVARCHAR(100),
    beneficiary_contact NVARCHAR(50),
    agent_name NVARCHAR(100),
    agent_contact NVARCHAR(50),
    coverage_details NVARCHAR(255),
    endorsements_riders NVARCHAR(255),
    underwriter_name NVARCHAR(100)
);
GO

-- Verify the table creation
SELECT * FROM PolicyIssuance;
GO
To check the details of the table created, use:
sp_help PolicyIssuance;
Step 2: Create the SSIS Package
Configure the Foreach Loop Container
- Open SQL Server Data Tools (SSDT) or Visual Studio with SSIS extension installed.
- Create a new SSIS project.
- Create a variable
var_FilePath(String) to store the full path of the current file being processed. - Drag a Foreach Loop Container onto the Control Flow tab.
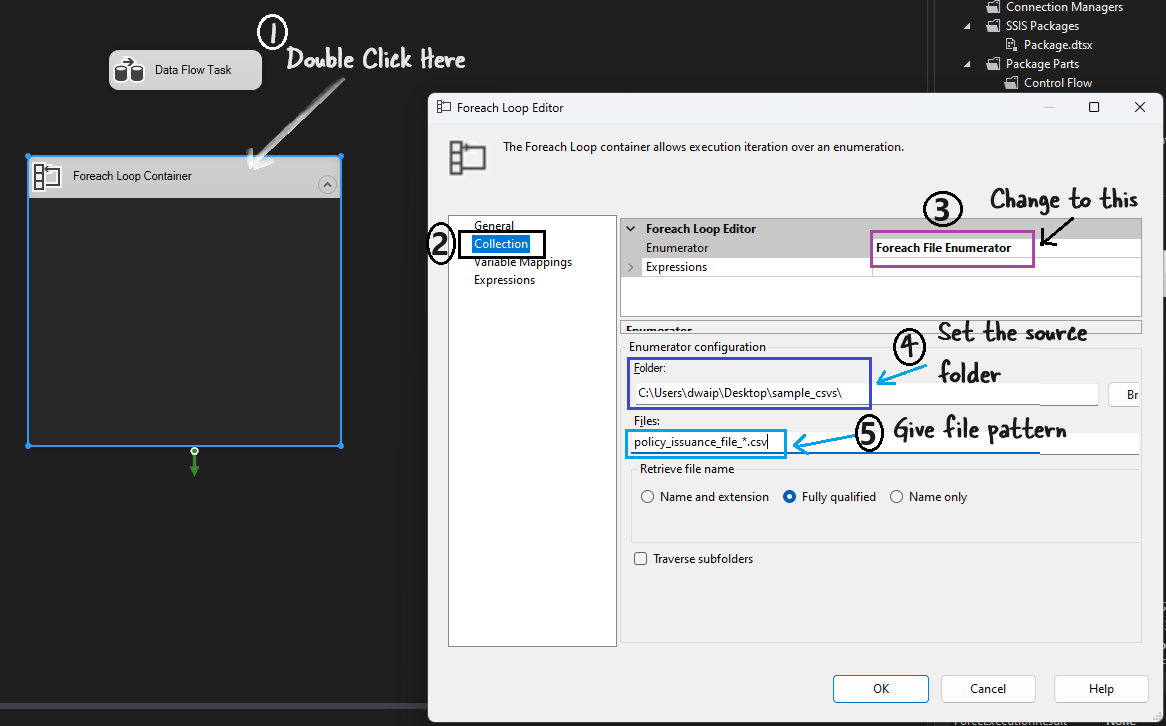
- Double-click the Foreach Loop Container to open the editor.
- In the Collection tab:
- Set Enumerator to Foreach File Enumerator.
- Set Folder to
C:\Users\dwaip\Desktop\sample_csvs\. - Set Files to
policy_issuance_file_*.csvto process all files matching this pattern.
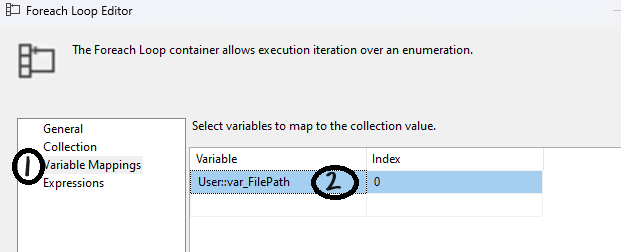
- In the Variable Mappings tab:
- Add the
FilePathvariable and set the Index to 0.
- Add the
- In the Collection tab:
- Drag a Data Flow Task into the Foreach Loop Container.
Configure the Data Flow Task
- Double-click the Data Flow Task to open the Data Flow tab.
- Add a Flat File Source to the Data Flow.
- Double-click the Flat File Source to configure it.
Configure Flat File Connection Manager
- In the Flat File Source Editor, click New to create a new Flat File Connection Manager.
- Set up the connection manager using any one of the sample CSV files (e.g.,
policy_issuance_file_1.csv) to configure the columns. - Once configured, click OK.
Set Connection String to Dynamic
- In the Flat File Connection Manager:
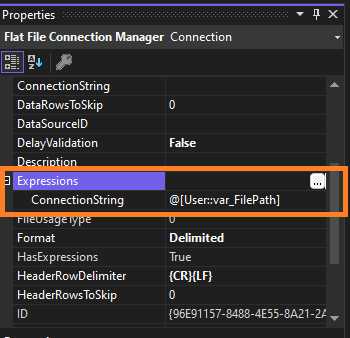
- Go to Properties and find Expressions.
- Click the ellipsis (
...) next to Expressions. - In the Property dropdown, select ConnectionString.
- Set the expression to use the
var_FilePathvariable:@[User::var_FilePath].
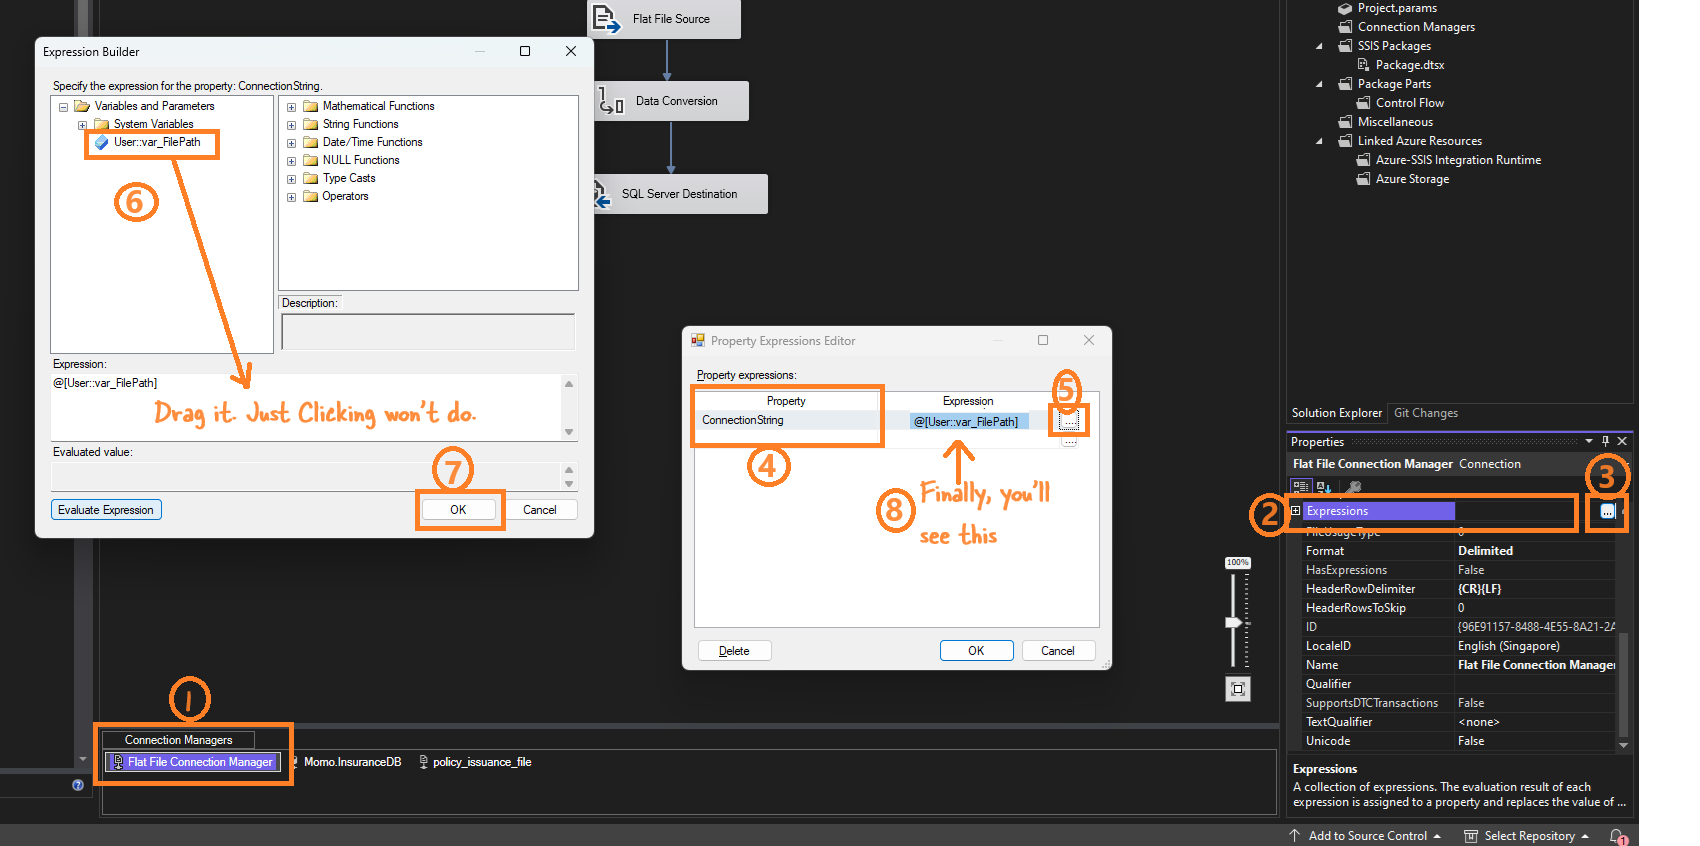
If the setting is correct you will see this:
Add Data Conversion Transformation
- Add a Data Conversion Transformation.
- Configure it to convert the necessary columns :
policyholder_name(original) converted toCopy of policyholder_nameinsured_name(original) converted toCopy of insured_name- Other columns..
Add SQL Server Destination
- Add an OLE DB Destination to the Data Flow.
- Connect the Data Conversion Transformation to the OLE DB Destination.
- Configure the OLE DB Destination to map the columns correctly to the
PolicyIssuancetable.
Map Columns in OLE DB Destination
- Open the SQL Server Destination Editor.
- Go to the Mappings Tab.
- Map the converted columns:
Copy of policyholder_nametopolicyholder_nameCopy of insured_nametoinsured_nameCopy of beneficiary_nametobeneficiary_name- Similarly, map other converted columns as needed.
Test Run the Package
- Save the package.
- Right-click the package and select Execute Package.
- Check the MSSQL table to verify the data has been loaded correctly.
Step 3: Deploy and Schedule the SSIS Package in MSSQL Server
To deploy your SSIS package and schedule it to run once a day, follow these steps:
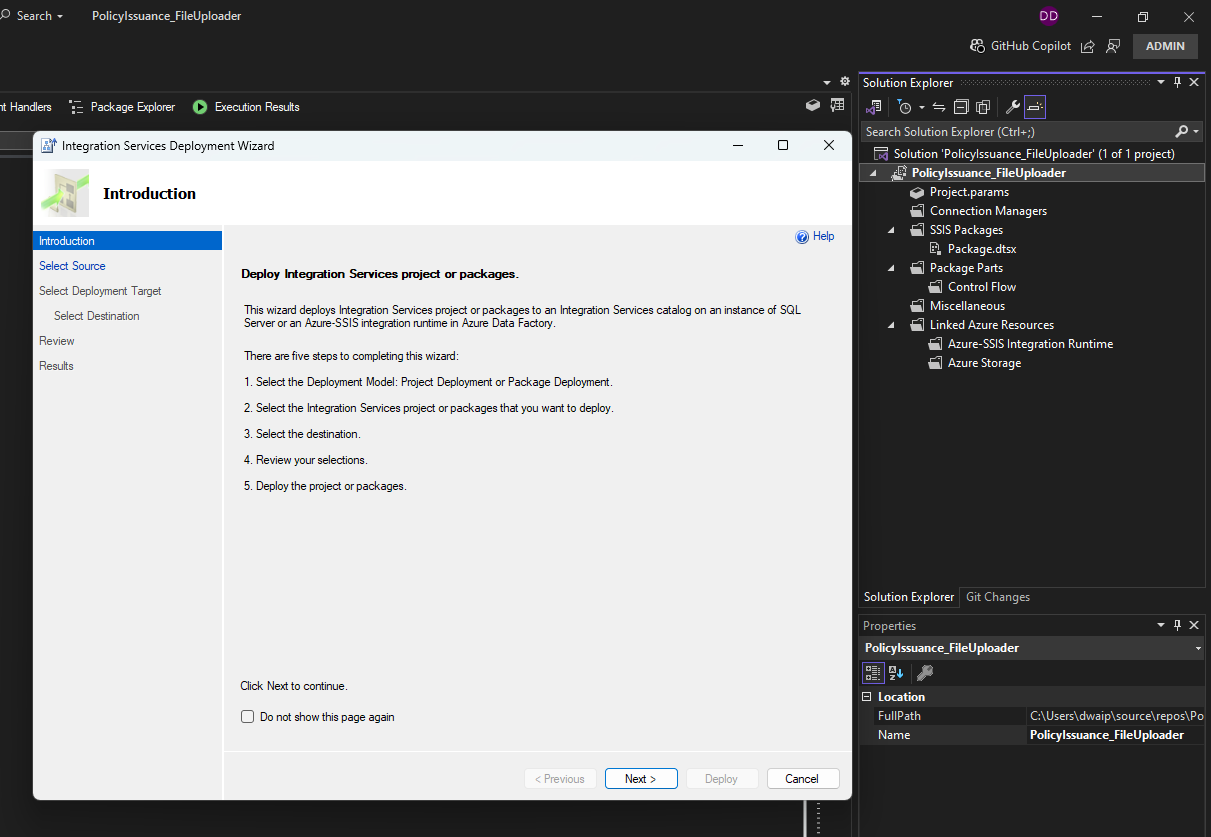
Deploy the SSIS Package
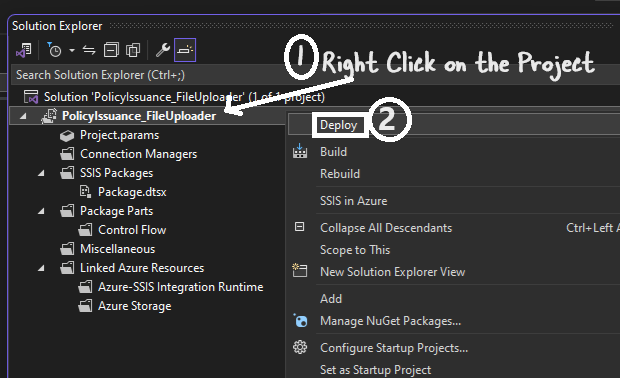
- Deploy the Package:
- Right-click the project in the Solution Explorer and select “Build” to ensure there are no errors.
- Right-click the project and select “Deploy”.
- The Integration Services Deployment Wizard will open. Follow the steps:
-
Select SSIS in SQL Server as the deployment target.

-
Provide the server name and path where the package will be deployed.
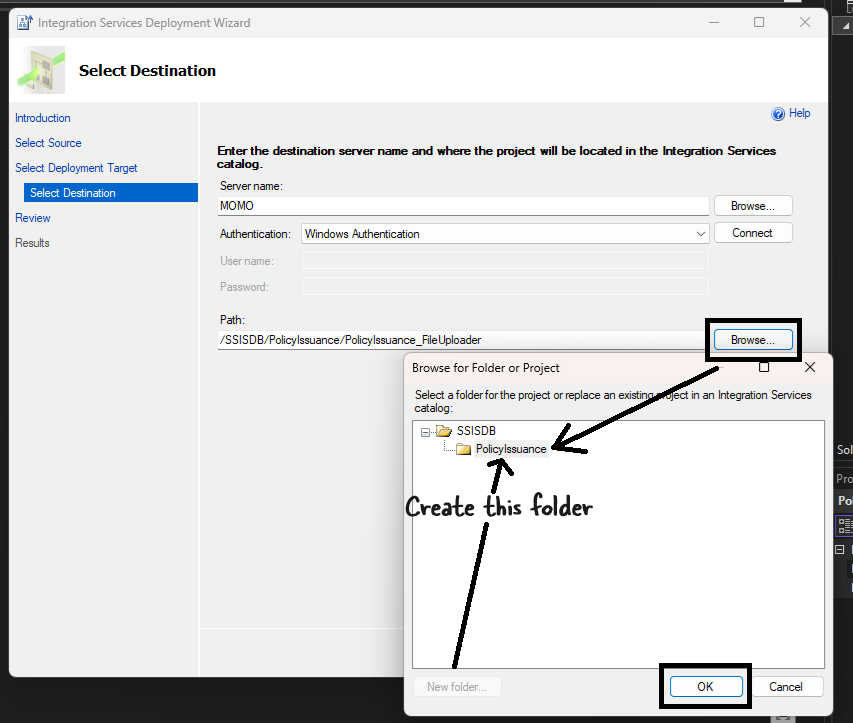
-
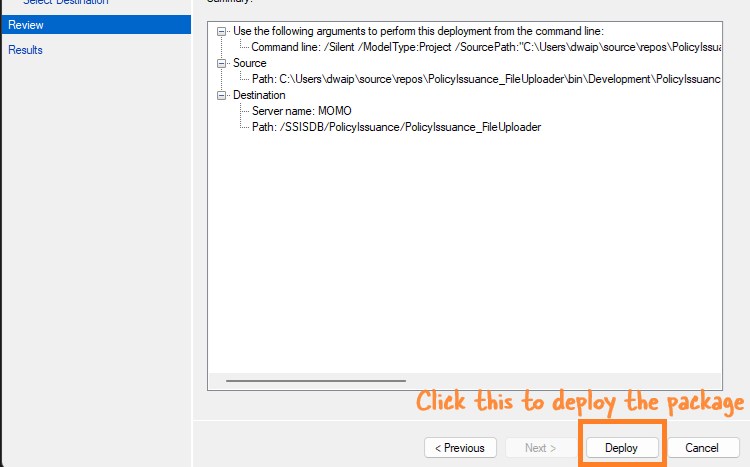
Finally, click Deploy to deploy the package.
-
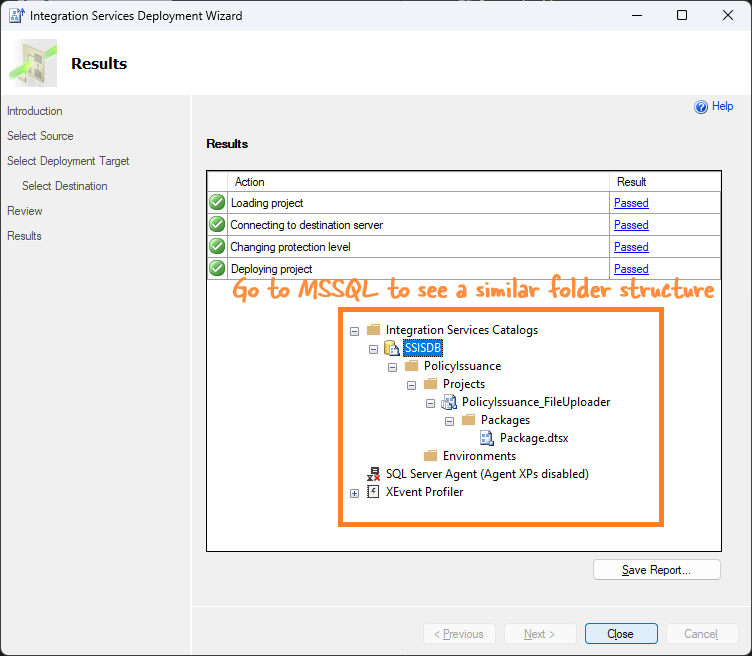
If everything goes well, your package will be deployed.
-
Schedule the Package using SQL Server Agent
Create a New SQL Server Agent Job
-
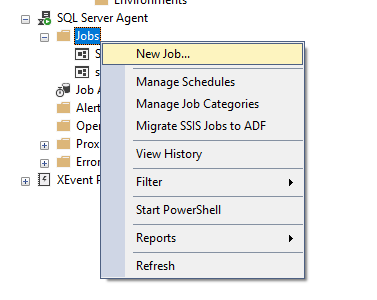
Connect to your SQL Server instance. Expand the SQL Server Agent node. Right-click Jobs and select New Job.
-
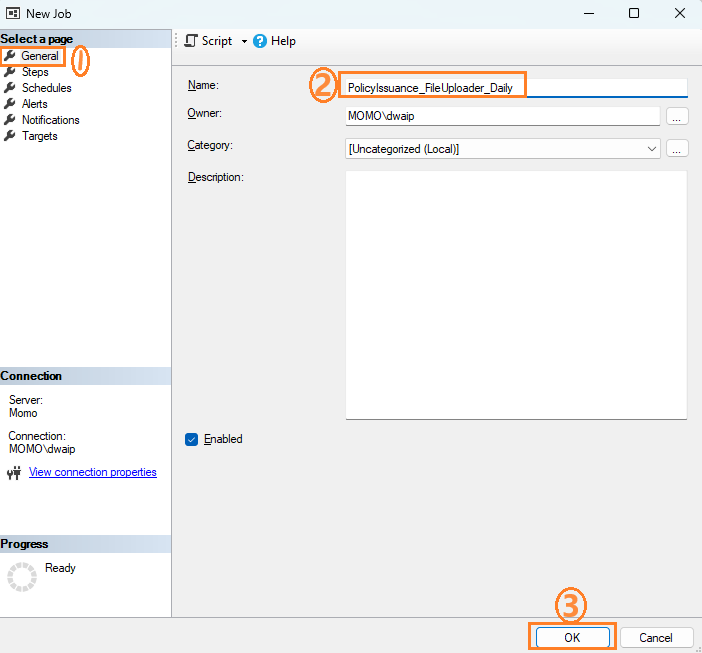
In the “New Job” window, provide a name for the job (e.g., “Daily SSIS Package Run”).
Set Job Steps
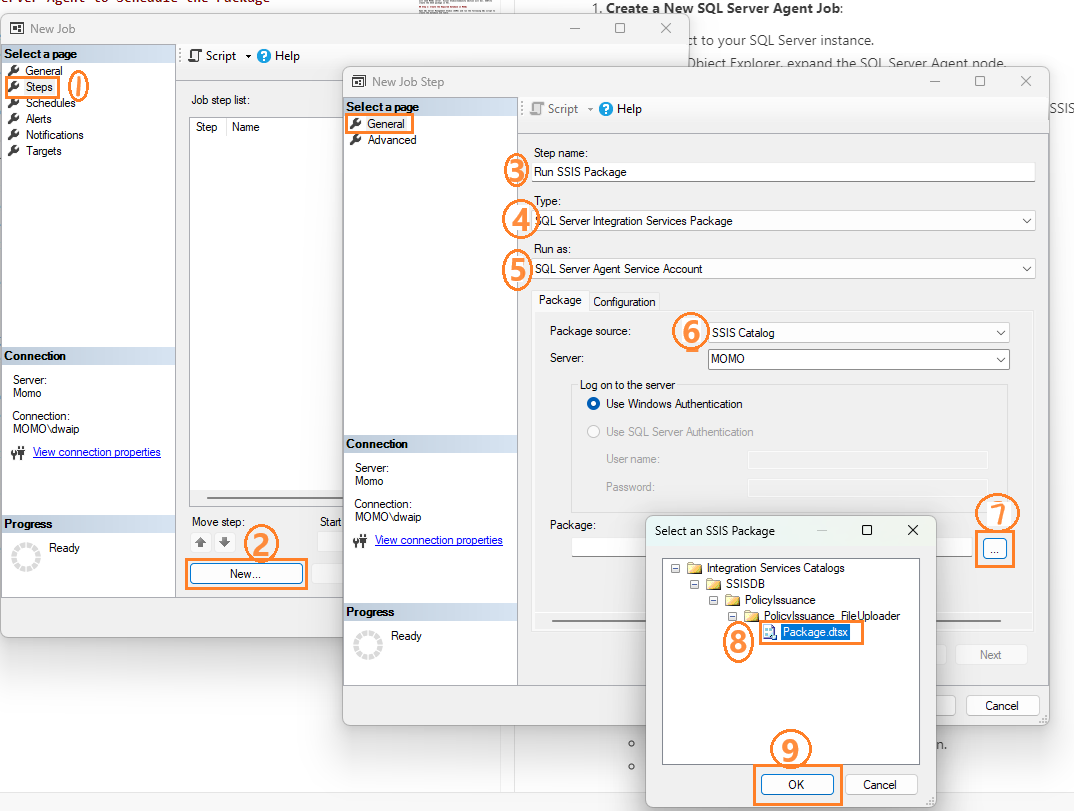
- In the Steps page, click New to create a new step.
- Set the Step name (e.g., “Run SSIS Package”).
- Set Type to SQL Server Integration Services Package.
- Set “Package source” to “SSIS Catalog”.
- Select the server and the package you deployed.
-
Click “OK” to save the step.
Set Job Schedule
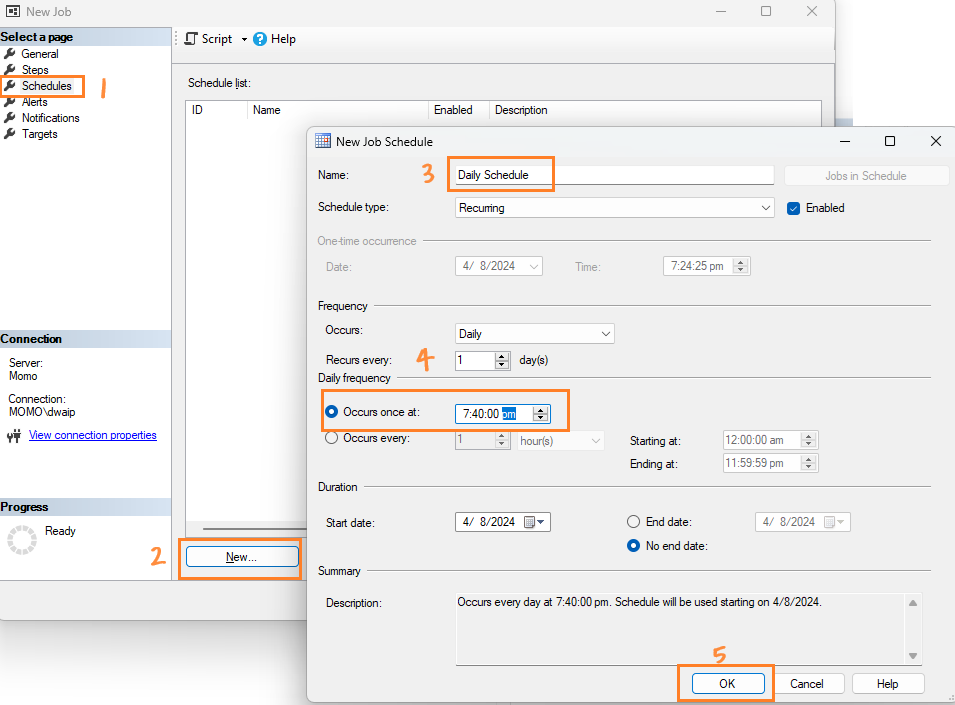
- In the “Schedules” page, click “New” to create a new schedule.
- Provide a name for the schedule (e.g., “Daily Schedule”).
- Set the frequency to “Daily”.
- Set the time of day you want the package to run.
-
Click “OK” to save the schedule.
Set Notifications (Optional)
- In the “Notifications” page, set up notifications to receive alerts in case of job failure or success.
Save the Job
- Click “OK” to save the job.
Common Errors and Their Solutions
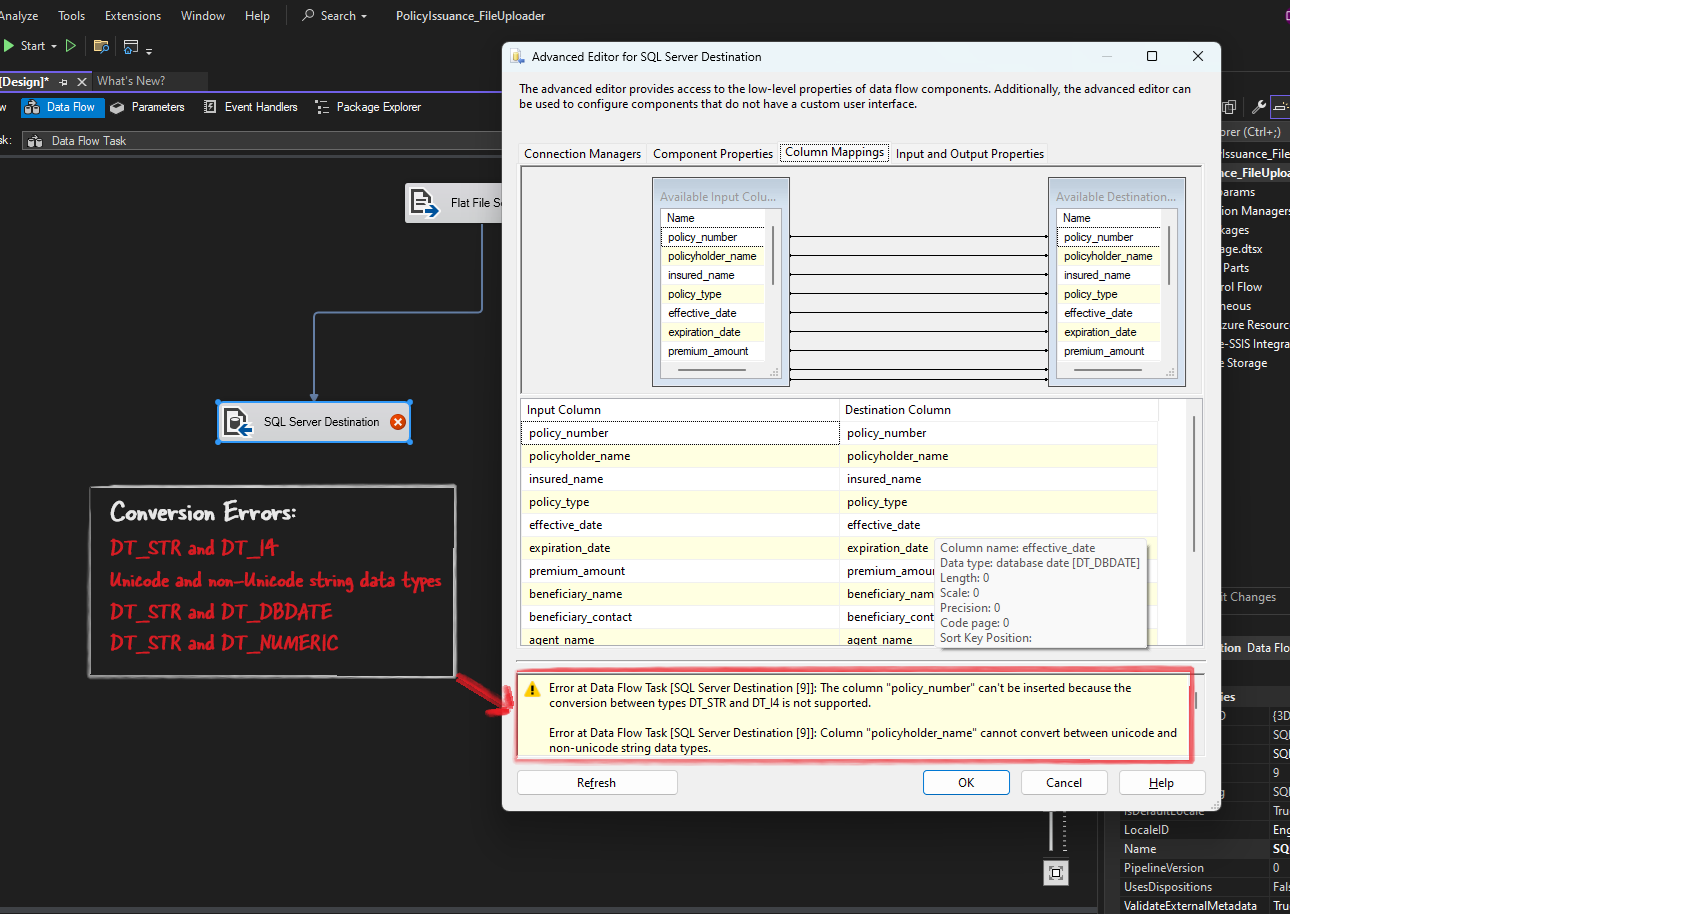
The most common errors will be related to size mismatch and type mismatch. There will also be Unicode-non-Unicode type mismatch issues.
For text files, choose Unicode string [DT_WSTR] as the output which can be mapped to MSSQL server NVARCHAR variables.
I was able to ingest data from .csv files correctly using the DT_STR format. This means the data can come in as DT_STR, but it needs to go into MSSQL as DT_WSTR.
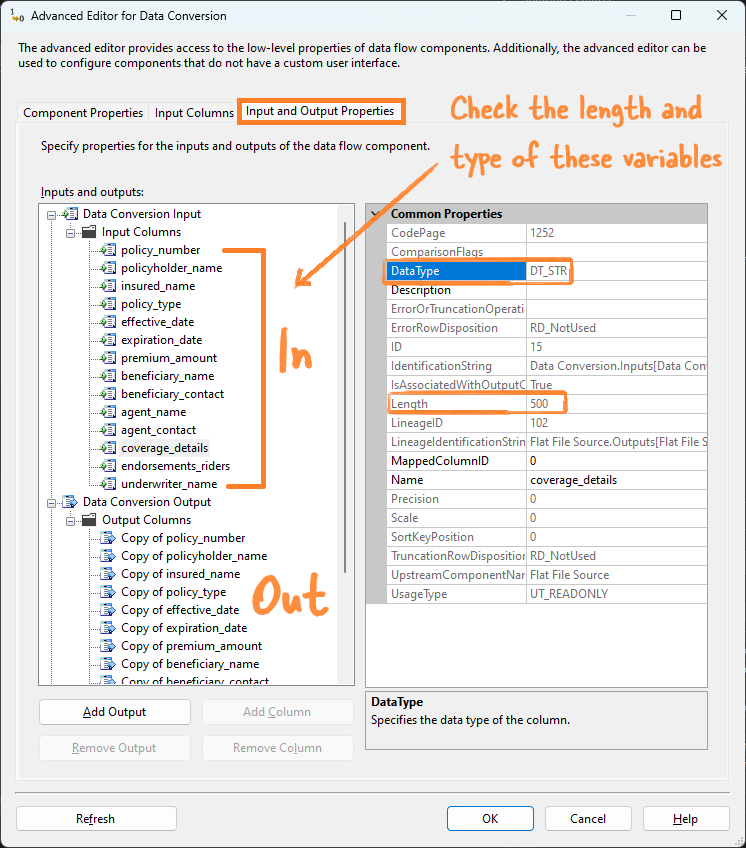
The coverage_details field was the largest in the .csv file and caused the most errors. So, I will explain the errors using this field as an example.
Input and Output Properties Tab - Common place for error troubleshooting
Go to the Input and Output Properties in the Advanced Editor (right-click the step).
Truncation Errors
If coverage_details is set to 50 characters in External Columns but the actual data is 200 characters, SSIS will try to fit long text into a smaller space, causing a truncation error. The error message will say, “Text was truncated or one or more characters had no match in the target code page.”
Data Conversion Errors
If coverage_details is defined as a numeric column in SSIS but the source file contains text data, a conversion error will occur. The error message will say, “Data conversion failed. The data conversion for column ‘coverage_details’ returned status value 2 and status text ‘The value could not be converted because of a potential loss of data.’”
Mapping Errors
These happen when the source column and destination column are not compatible in terms of data types or lengths. For example, if coverage_details is set to 200 characters in SSIS but the SQL Server table defines it as 100 characters, SSIS will not be able to map the data correctly. The error message will say, “Cannot convert between Unicode and non-Unicode string data types.”
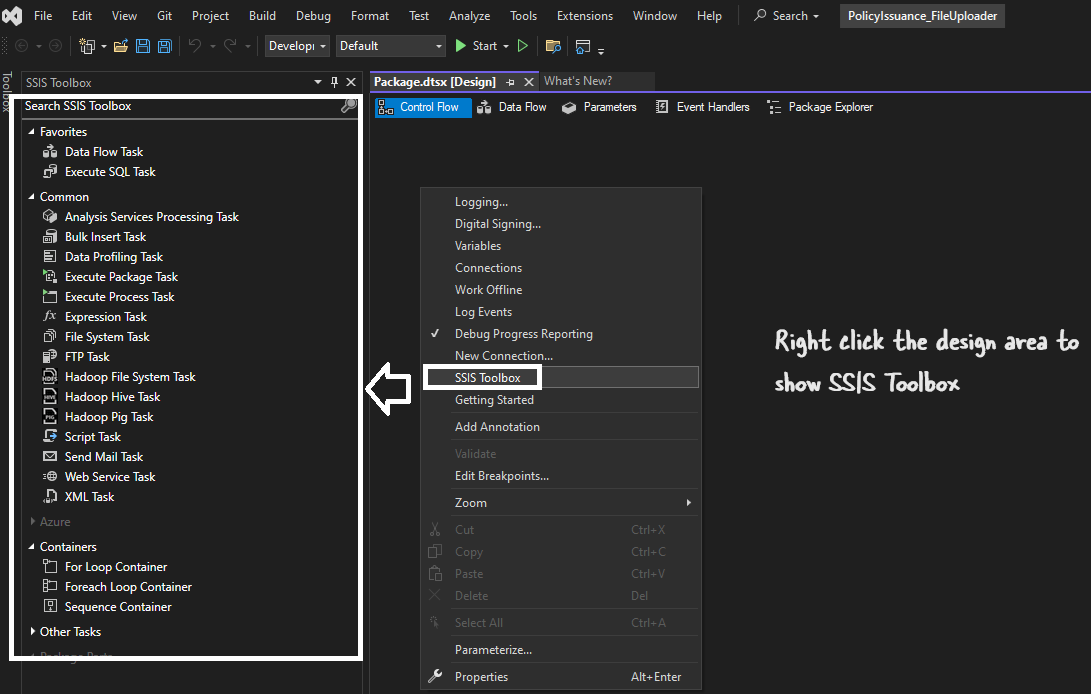
SSIS toolbox not visible
In the newer version of VS sometimes the SSIS Toolbox might be absent. You just have to right-click and select SSIS Toolbox. That’s it.
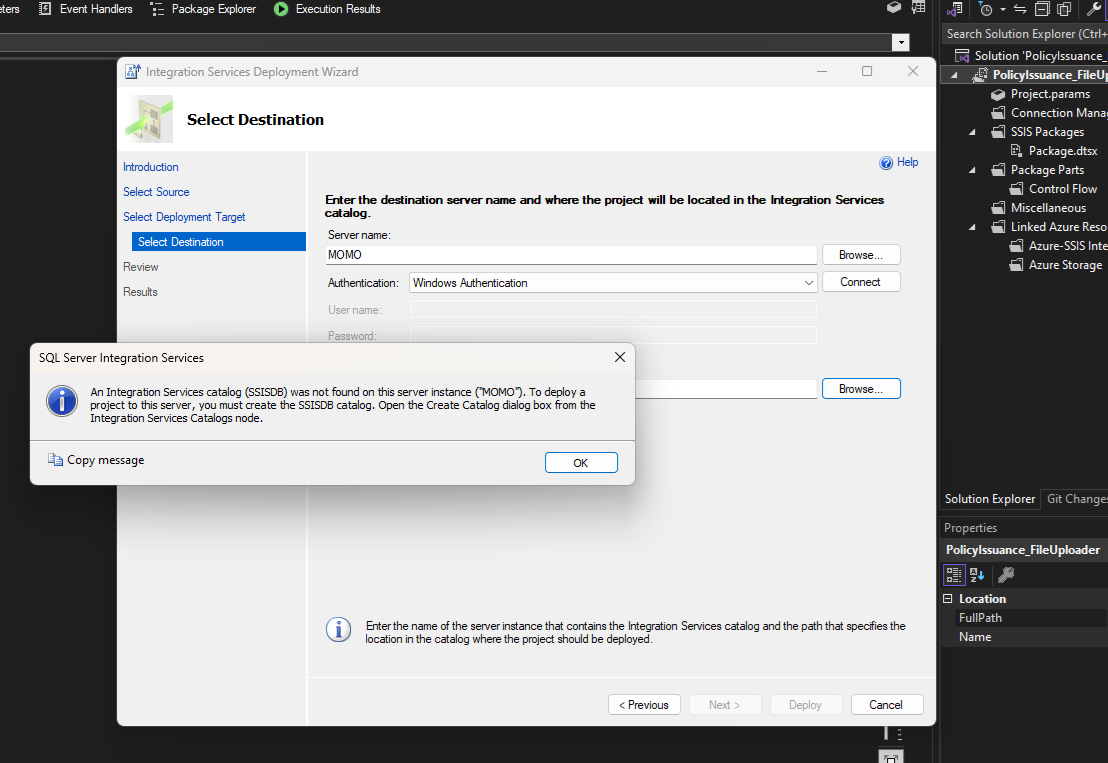
SSISDB not found
An Integration Services catalog (SSISDB) was not found on this server instance. To deploy a project to this server, you must create the SSISDB catalog. Open the Create Catalog dialog box from the Integration Services Catalogs node.
Resolution
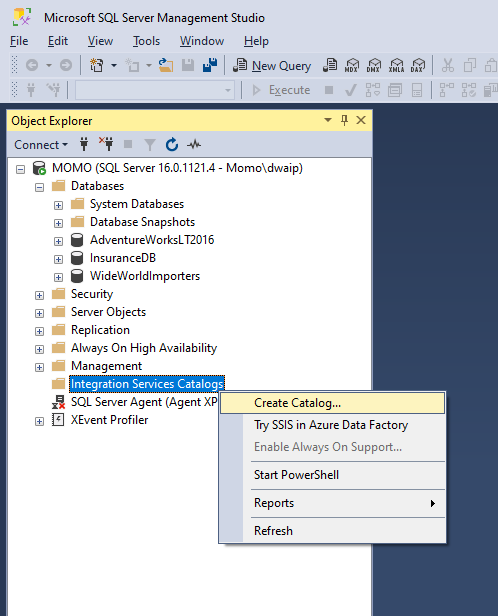
- Open SSMS and connect to your SQL Server instance.
- In the Object Explorer, expand the “Integration Services Catalogs” node.
-
Right-click and select “Create Catalog…”.
-
In the “Create Catalog” dialog box, check the “Enable CLR Integration” checkbox.
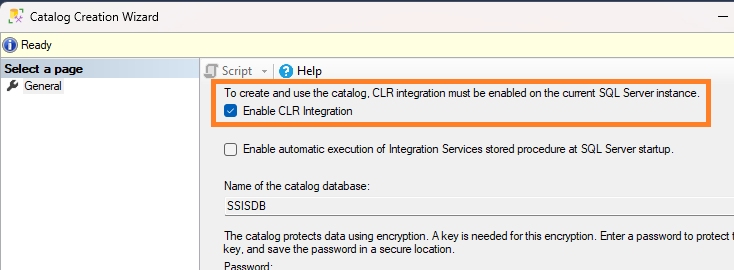
- Enter a password for the SSISDB database master key. This password will be used to secure the catalog.
-
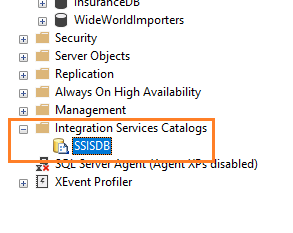
Click “OK” to create the catalog. You will see a SSISDB created inside the Integration Services Catalogs folder. Now, you can deploy your projects here.
