- Understanding Dockerfile CMD and ENTRYPOINT Instructions
- Docker PS Error
- Backup entire docker to your laptop
- Docker common errors
- Orchestration Tools - Docker Swarm vs Kubernetes
- Summary
- Common docker commands
- Running Windows OS as a Container in Docker
- Types of Kubernetes
- How I push customized Images to Docker Hub(Website)
- Troubleshooting docker errors
Understanding Dockerfile CMD and ENTRYPOINT Instructions
CMD and ENTRYPOINT are important Dockerfile instructions that define what command runs when a Docker container starts. Here, I will try to explain the concepts:
What is ENTRYPOINT?
ENTRYPOINT sets the main process that will run inside the container. For example:
ENTRYPOINT ["/usr/bin/my-app"]
In this case, /usr/bin/my-app is the process that will run when the container starts.
What is CMD?
CMD specifies the default arguments for the ENTRYPOINT process. For instance:
ENTRYPOINT ["/usr/bin/my-app"]
CMD ["help"]
Here, help is passed as an argument to /usr/bin/my-app.
Key Differences Between ENTRYPOINT and CMD
- ENTRYPOINT: Defines the main process to run in the container.
- CMD: Provides default arguments for the ENTRYPOINT process.
- Override:
- CMD can be easily overridden by passing arguments in the
docker runcommand. - ENTRYPOINT can be changed using the
--entrypointflag indocker run, but this is rarely necessary.
- CMD can be easily overridden by passing arguments in the
Docker PS Error
For Our Windows Users:
- Verify Docker’s Installation Path:
- Navigate to
C:\Program Files\Docker\Docker\resources\binvia your command prompt or PowerShell. - While you’re there, try running
docker ps. If it responds, you’re in luck! If not, let’s move to the next step.
- Navigate to
- Update the System PATH:
- Sometimes, Windows isn’t aware of where Docker is. We’ll need to tell it.
- Open ‘System Properties’ by right-clicking on the Windows start button and selecting ‘System’.
- Click on ‘Advanced system settings’, then choose ‘Environment Variables’.
- Locate the PATH variable under ‘System Variables’. Click on it and then select ‘Edit’.
- Add a new entry with the path:
C:\Program Files\Docker\Docker\resources\bin. - Confirm with ‘OK’.
- Using PowerShell to Update the PATH:
- If you’re a fan of PowerShell, you can also add the path using the following command:
[Environment]::SetEnvironmentVariable("PATH", $env:PATH + ";C:\Program Files\Docker\Docker\resources\bin", "Machine")
- If you’re a fan of PowerShell, you can also add the path using the following command:
- Check if its running now. Just open command prompt and run
docker ps. You should get some output. For example:

For Our Mac Users:
- Verify Docker’s Installation:
- Open your terminal and type in
docker --version. This ensures that Docker is installed.
- Open your terminal and type in
- Is Docker Running?
- Check if the Docker Desktop application is running. If it’s not, fire it up!
- Update the Shell’s PATH:
- Sometimes, the shell doesn’t know where Docker is located. To fix this:
echo "export PATH=/usr/local/bin:$PATH" >> ~/.bash_profile
source ~/.bash_profile
- Sometimes, the shell doesn’t know where Docker is located. To fix this:
- Final Check:
- Close and reopen your terminal, then try
docker ps. If all’s well, it should work!
- Close and reopen your terminal, then try
Backup entire docker to your laptop
Save Docker Containers, Images, and Volumes on Mac/Linux
To back up Docker containers, images, and volumes on Mac/Linux, you can use the following script:
#!/bin/bash

# Create directories to store backups
mkdir -p docker_image_backups docker_container_backups docker_volume_backups

# Backup Docker images
for image in $(docker images --format ":"); do
  sanitized_image_name=$(echo $image | tr / _)
  docker save -o docker_image_backups/${sanitized_image_name}.tar $image
done

# Backup Docker containers
for container in $(docker ps -a --format ""); do
  docker export -o docker_container_backups/${container}.tar $container
done

# Backup Docker volumes
for volume in $(docker volume ls --format ""); do
  docker run --rm -v ${volume}:/volume -v $(pwd)/docker_volume_backups:/backup alpine sh -c "cd /volume && tar czf /backup/${volume}.tar.gz ."
done

# Create a single tarball containing all backups
tar czf docker_backup_$(date +%Y%m%d).tar.gz docker_image_backups docker_container_backups docker_volume_backups

echo "Backup completed successfully!"
To run the script:
- Save the script to a file, e.g.,
backup_docker.sh. -
Make the script executable:
chmod +x backup_docker.sh -
Run the script:
./backup_docker.sh
This will create a full backup of all Docker images, containers, and volumes.
Save Docker Containers, Images, and Volumes on Windows
To back up Docker containers, images, and volumes on Windows, follow these steps:
-
Create a folder and save the following content as
backup_docker.ps1:# Backup Docker Images docker images -q | ForEach-Object { docker save -o "$($_).tar" $_ } # Backup Running Containers docker ps -q | ForEach-Object { docker export -o "$($_).tar" $_ } # Backup Docker Volumes $volumes = docker volume ls -q foreach ($volume in $volumes) { docker run --rm -v ${volume}:/volume -v $(pwd):/backup ubuntu tar cvf /backup/${volume}_backup.tar /volume } # Backup Docker Configurations Copy-Item -Path "C:\path\to\your\docker\configurations" -Destination "C:\path\to\your\backup\location" -Recurse -
Open PowerShell with administrative privileges and navigate to the folder you created:
cd path\to\your\folder -
Set the execution policy to allow the script to run temporarily:
Set-ExecutionPolicy -ExecutionPolicy Bypass -Scope Process -
Run the script:
.\backup_docker.ps1
This way you can back up all your Docker containers, images, and volumes to the current folder.
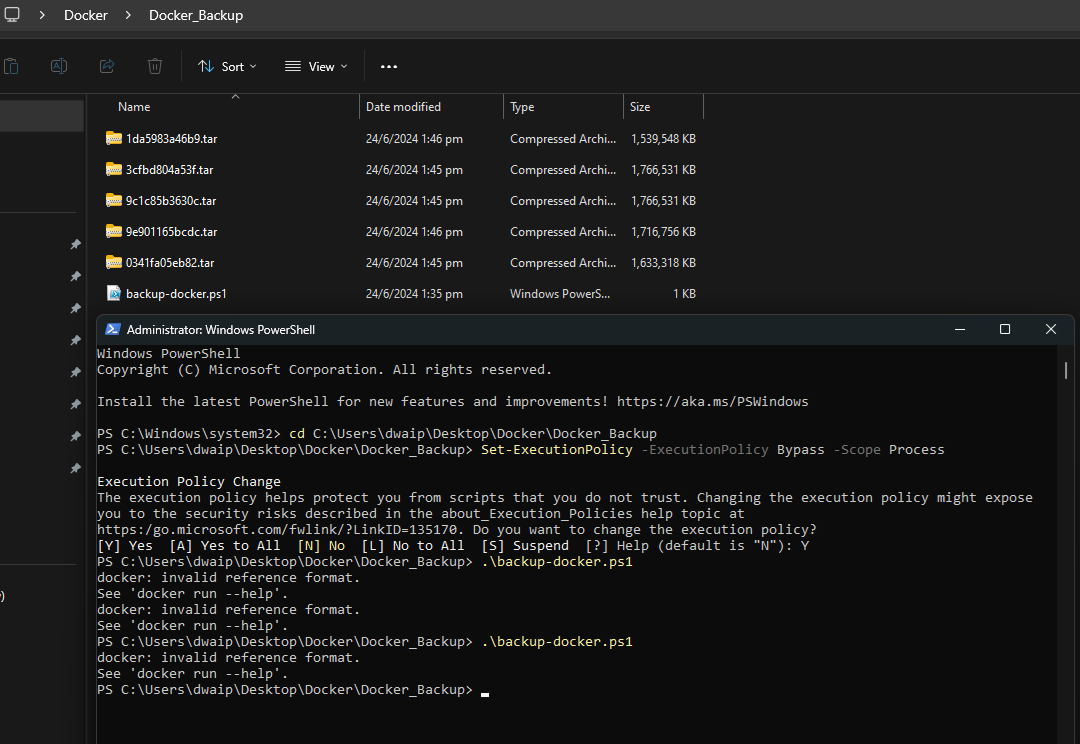
Docker common errors
HTTP code 500) server error - Ports are not available: exposing port TCP 0.0.0.0:50070 -> 0.0.0.0:0: listen tcp 0.0.0.0:50070: bind: An attempt was made to access a socket in a way forbidden by its access permissions.
Execute command
net stop winnat
docker start <full container name>
net start winnat
Orchestration Tools - Docker Swarm vs Kubernetes
To manage complex applications, many developers use containers. Containers package all the necessary dependencies, making applications portable, fast, secure, scalable, and easy to manage. To handle multiple containers, you need an orchestration tool like Docker Swarm or Kubernetes.
Both tools manage containers but have different strengths and weaknesses. This article will help you decide which one is right for you.
Docker Swarm
Docker Swarm, an open-source orchestration tool by Docker, turns multiple Docker instances into a single virtual host. Here are its key components:
| Component | Description |
|---|---|
| Nodes | Individual Docker instances. |
| Services and Tasks | The applications you run. |
| Load Balancers | Distribute requests across nodes. |
Advantages of Docker Swarm:
- Ease of Use: Simple installation and understanding.
- Integration: Works seamlessly with Docker CLI.
- Automated Load Balancing: Distributes traffic within the cluster automatically.
Disadvantages of Docker Swarm:
- Limited Functionality: Less powerful compared to Kubernetes.
- Basic Automation: Not as robust as Kubernetes.
Kubernetes
Kubernetes, developed by Google, offers a more complex structure with nodes, pods, namespaces, and more.
| Component | Description |
|---|---|
| Nodes | Worker machines in the cluster. |
| Pods | Smallest deployable units, containing one or more containers. |
| Namespaces | Logical isolation for resources. |
Advantages of Kubernetes:
- Community Support: Backed by Google, with a large open-source community.
- Operating System Support: Works on all OS.
- Scalability and Management: Handles large and complex workloads.
- Automation and Self-Healing: Automatically scales and repairs itself.
- Built-in Monitoring: Includes monitoring tools.
- Cloud Support: Available on Google Cloud, Azure, and AWS.
Disadvantages of Kubernetes:
- Complexity: Difficult to install and learn.
- Separate Tools: Requires learning new CLI tools.
- Transition: Moving from Docker Swarm can be challenging.
- Overhead: Can be overly complex for simple applications.
Comparing Docker Swarm and Kubernetes
| Aspect | Docker Swarm | Kubernetes |
|---|---|---|
| Installation | Easy to install and use. Works with Docker CLI. | Complex installation, separate CLI tools. |
| Application Deployment | YAML or Docker Compose for services or microservices. | More options like namespaces, pods, and deployments. |
| Availability and Scaling | High availability, but no automatic scaling. | Highly available, fault-tolerant, self-healing, and automatic scaling. |
| Monitoring | Requires third-party tools. | Built-in monitoring and third-party integrations. |
| Security | Uses TLS for security. | Supports multiple security protocols (RBAC, SSL/TLS, secrets management). |
| Load Balancing | Automatic load balancing using DNS. | Uses tools like Nginx Ingress for load balancing. |
K3s, best of both worlds
K3s, a lightweight version of Kubernetes. It gives you the full Kubernetes API without complexity. It’s easy to use and CNCF certified. Consider K3s if you want Kubernetes features with simpler management.
Which One Should You Choose?
- Docker Swarm: Best for beginners and small-scale applications due to its ease of use.
- Kubernetes: Ideal for complex and large-scale projects requiring robust features and automation.
- K3s: Suitable if you want Kubernetes features with less complexity.
Summary
| Feature | Docker Swarm | Kubernetes | K3s |
|---|---|---|---|
| Component | - Nodes: Individual Docker instances. - Services and Tasks: The applications you run. - Load Balancers: Distribute requests across nodes. | - Nodes: Worker and master nodes. - Pods: Smallest deployable units. - Namespaces: Virtual clusters. - Config Maps: Manage configuration. | - Nodes: Worker and master nodes. - Pods: Smallest deployable units. - Namespaces: Virtual clusters. - Config Maps: Manage configuration. |
| Advantages | - Ease of Use: Simple installation and understanding. - Integration: Works seamlessly with Docker CLI. - Automated Load Balancing: Distributes traffic within the cluster automatically. | - Community Support: Backed by Google, large open-source community. - Operating System Support: Works on all OS. - Scalability and Management: Handles large and complex workloads. - Automation and Self-Healing: Automatically scales and repairs itself. - Built-in Monitoring: Comes with monitoring tools. - Cloud Support: Available on Google Cloud, Azure, and AWS. | - Lightweight: Easier and faster to set up. - Complete Kubernetes API: Offers all features without extra complexity. - CNCF Certified: Ensures compatibility and support. |
| Disadvantages | - Limited Functionality: Less powerful compared to Kubernetes. - Basic Automation: Not as robust as Kubernetes. | - Complexity: Difficult to install and learn. - Separate Tools: Requires learning new CLI tools. - Transition: Moving from Docker Swarm can be hard. - Overhead: Can be overly complex for simple applications. | - Limited Community Support: Smaller user base compared to Kubernetes. - Fewer Integrations: May not support all third-party tools. |
| Application Deployment | Deploy services or microservices using YAML or Docker Compose. | Offers more options like namespaces, pods, and deployments. | Supports deployments using YAML files with simplified configurations. |
| Availability and Scaling | High availability, but no automatic scaling. | Highly available, fault-tolerant, self-healing, and automatic scaling. | Provides high availability and simple scaling mechanisms. |
| Monitoring | Requires third-party tools. | Built-in monitoring and third-party integrations. | Supports basic monitoring with options for third-party integrations. |
| Security | Uses TLS for security. | Supports multiple security protocols like RBAC, SSL/TLS, secrets management. | Provides essential security features with easier management. |
| Load Balancing | Automatic load balancing using DNS. | Uses tools like Nginx Ingress for load balancing. | Simplified load balancing with integrated tools. |
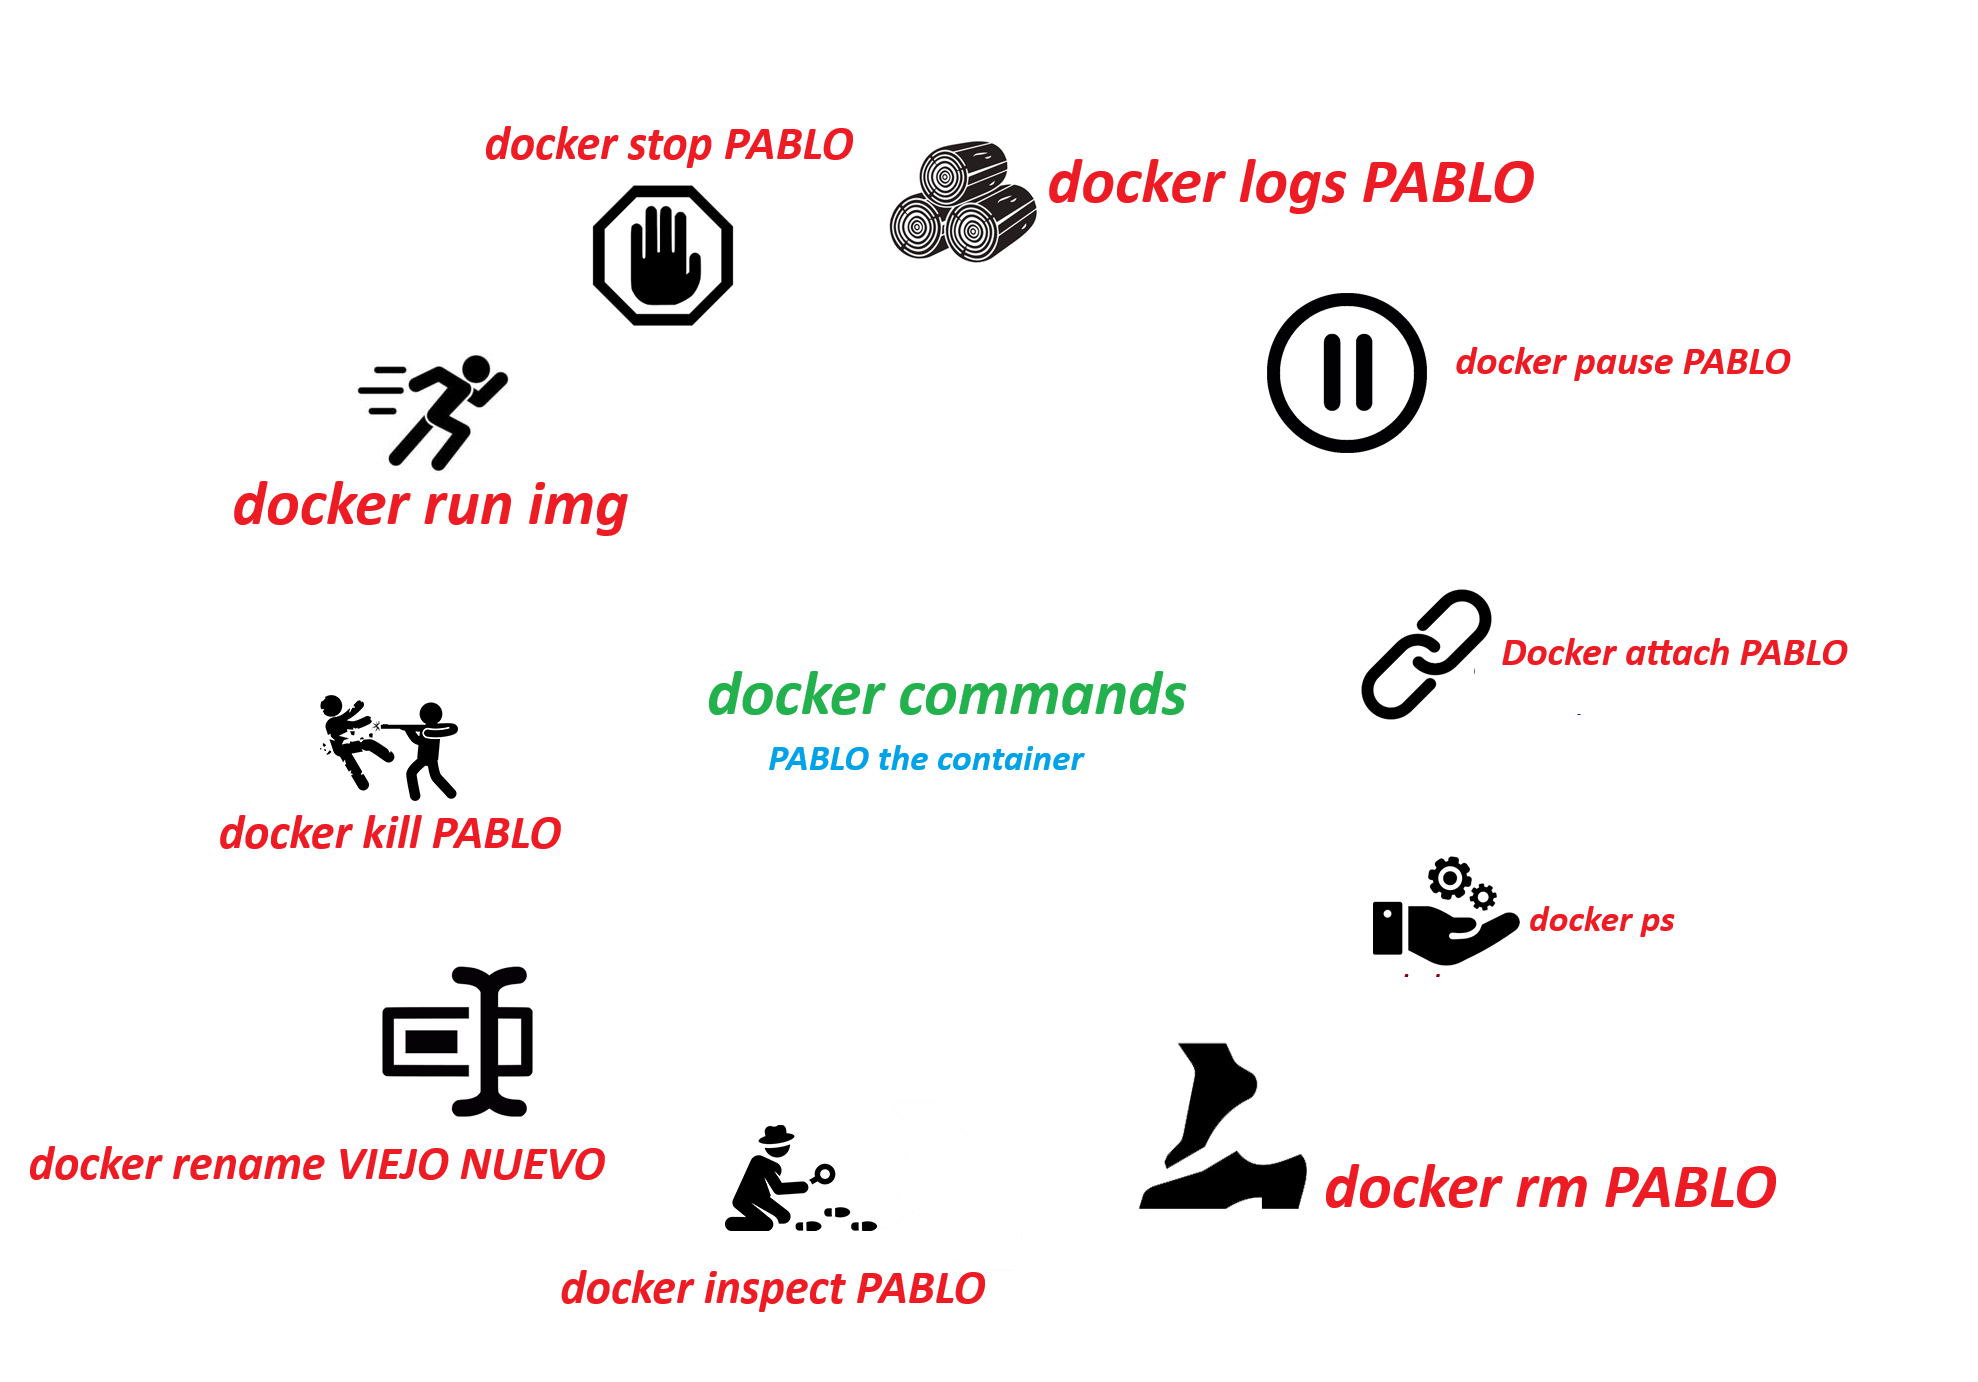
Common docker commands
| Purpose | Command |
|---|---|
| 🏃 Run | docker run <image> |
| ⏹️ Stop | docker stop <container> |
| ▶️ Start | docker start <container> |
| 🗑️ Remove Ctr | docker rm <container> |
| 🖼️ Remove Img | docker rmi <image> |
| 📃 List Ctrs | docker ps |
| 🖼️ List Imgs | docker images |
| ⬇️ Pull | docker pull <image> |
| ⌨️ Exec | docker exec <container> |
| 🏗️ Build | docker build -t <tag> . |
| 🔊 Logs | docker logs <container> |
| 🔍 Inspect | docker inspect <container_or_image> |
| 📊 Stats | docker stats <container> |
| 📁 Volume List | docker volume ls |
| 🆕 Volume Create | docker volume create <volume_name> |
| 🚮 Volume Remove | docker volume rm <volume_name> |
| 🌐 Network List | docker network ls |
| 🌉 Network Create | docker network create <network> |
| 📡 Network Connect | docker network connect <network> <container> |
| 🔌 Network Disconnect | docker network disconnect <network> <container> |
| 🔄 Pull Latest | docker pull <image>:latest |
| 🚫 Build No Cache | docker build --no-cache -t <tag> . |
Running Windows OS as a Container in Docker
When you think of containers, you usually picture a small Linux OS. And you’re right! But did you know that containers can run a small Windows OS too?
Switching Docker Desktop to Windows Mode
For most of your tasks, you’ve likely been using Docker containers, which are typically Linux-based. Running a Windows container might seem unusual. By default, Docker on your Windows machine operates in ‘Linux mode.’ To run Windows containers, you’ll need to switch from this default Linux mode to Windows mode.
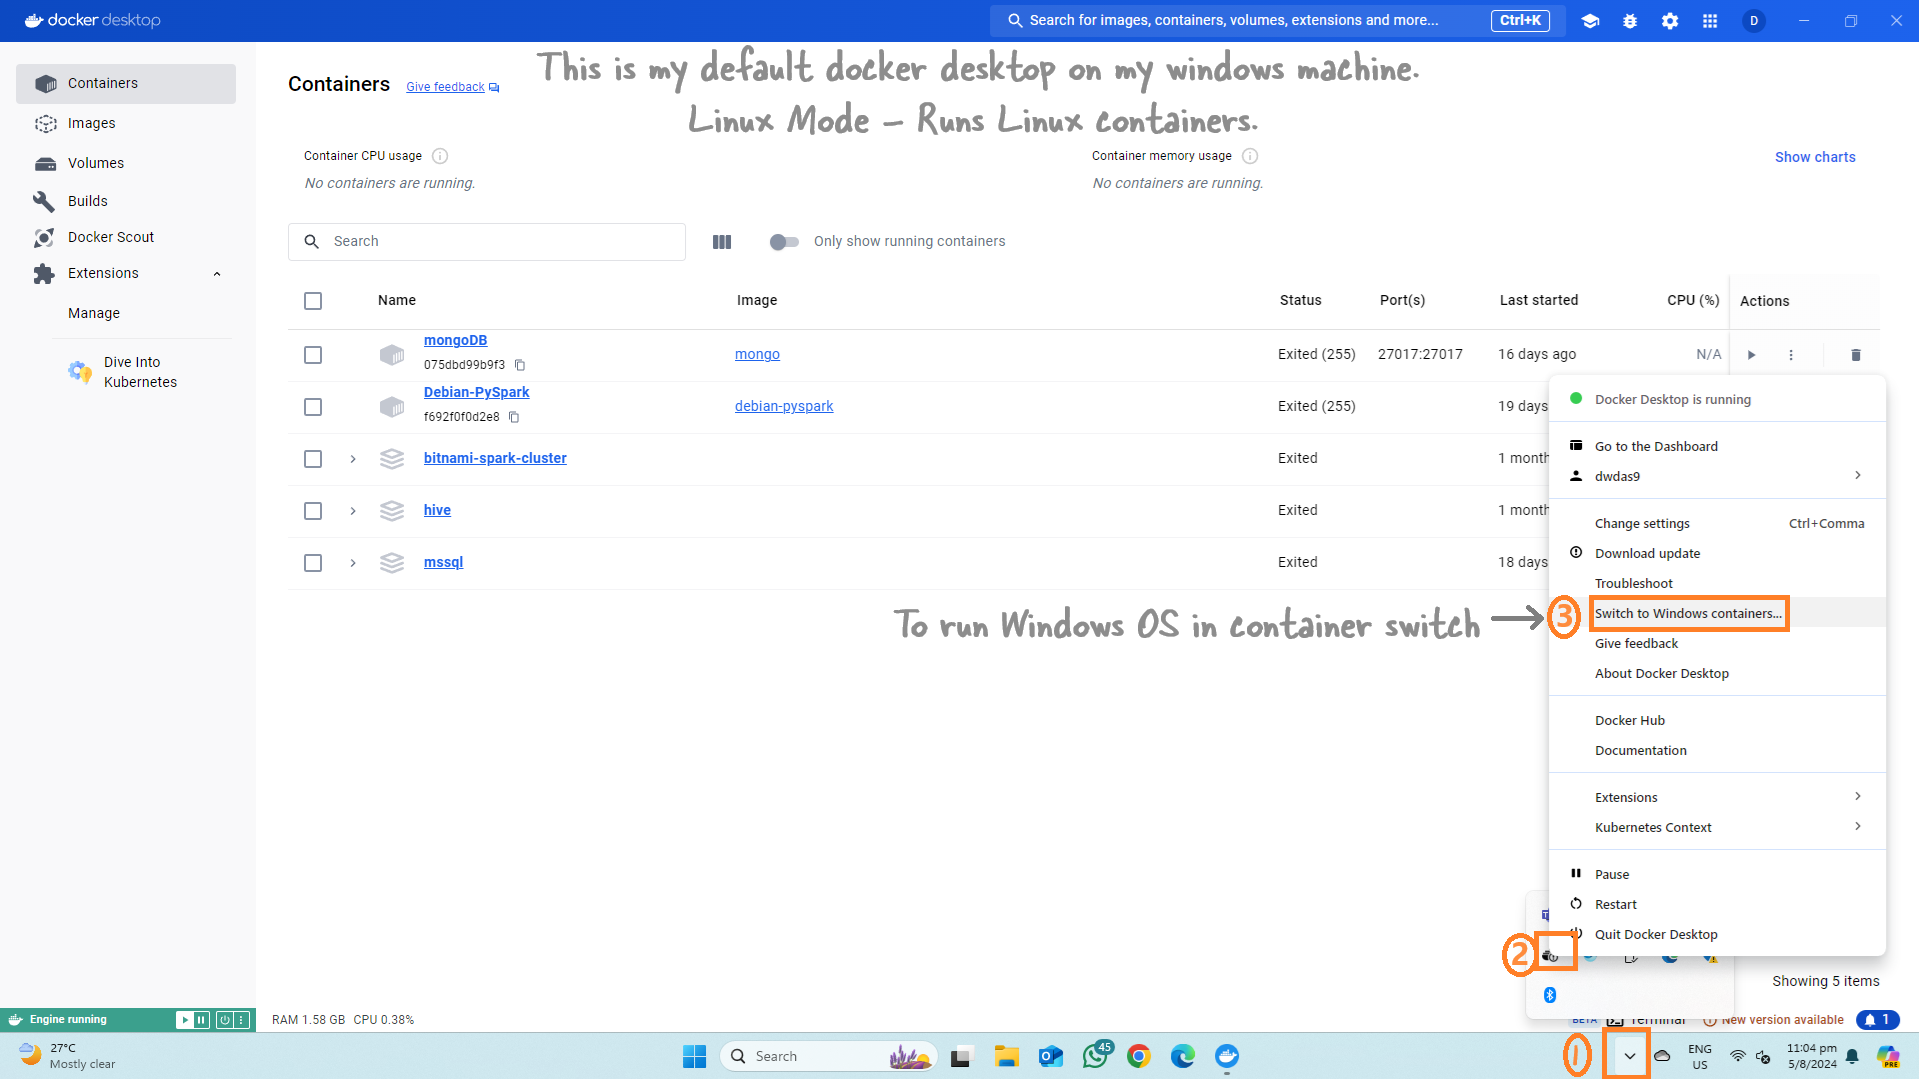
And you can switch back to Linux containers easily.

Note: When you switch to Windows mode, you won’t be able to see your Linux containers.
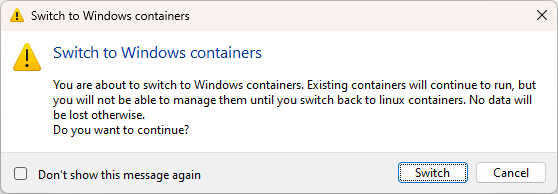
Switching Using Command Line
You can also switch using the command line:
& $Env:ProgramFiles\Docker\Docker\DockerCli.exe -SwitchDaemon
Further Reading
For more information, check out: Windows Containers Documentation
Microsoft Base Images
Microsoft offers several base images to start building your own container images:
- Windows: Contains the full set of Windows APIs and system services (excluding server roles).
- Windows Server: Contains the full set of Windows APIs and system services.
- Windows Server Core: A smaller image with a subset of Windows Server APIs, including the full .NET framework and most server roles (excluding some like Fax Server).
- Nano Server: The smallest Windows Server image, supporting .NET Core APIs and some server roles.
Ready-Made Bundles
Microsoft offers ready-made bundles that combine Windows Server 2022 with apps like MongoDB.
For example, if you need MongoDB on Windows Server 2022, you can use this Dockerfile.
Other Combinations
Other combinations you can create include:
- aspnet
- iis
- Django
- apache-http-php
- nginx
- dotnet35
- golang
- nodejs
- python
- python-django
- rails
- ruby
- server-jre-8u51-windows-x64
- mongodb
- mysql
- redis
- sqlite
- sqlserver-express
- PowerShellDSC_iis-10.0
Now you know that containers are not just small Linux OSs. They can be a mini Windows OS too!
Types of Kubernetes
Kubernetes is a system for managing containerized applications, but there are many ways to set it up based on your needs. The table below summriazes the various available kubernetes ‘brands’:
For the busy people:
- Development: Minikube, K3d, Docker Desktop Kubernetes, and Kind are geared toward development and testing.
- Production: Kubeadm, Rancher, K3s, and managed services like Amazon EKS, Google GKE, and Azure AKS are suited for production environments.
- Mixed Use: K3s and MicroK8s can be used both in development and production, especially in edge computing and IoT.
Kubernetes Brands
Here’s the revised table with the “Environment” column removed:
| Kubernetes Tool | Company/Provider | Best For | Single Machine Setup | Multi-Machine Setup | Used By |
|---|---|---|---|---|---|
| Minikube | Kubernetes Community (CNCF) | Development | Yes | No | Individual developers, small startups. |
| Kubeadm | Kubernetes Community (CNCF) | Production | Yes (single node) | Yes | Enterprises, cloud service providers. |
| Rancher | SUSE | Production | Yes (for management) | Yes | Enterprises, companies managing multi-cloud or hybrid environments. |
| K3s | Rancher (SUSE) | Development/Production | Yes | Yes | IoT companies, edge computing solutions, small and medium enterprises. |
| K3d | Rancher (SUSE) | Development | Yes | No | Developers, small companies for testing multi-node setups. |
| Docker Desktop Kubernetes | Docker, Inc. | Development | Yes | No | Developers using Docker, small teams. |
| MicroK8s | Canonical (Ubuntu) | Development/Production | Yes | Yes | IoT and edge computing companies, startups. |
| Amazon EKS | Amazon Web Services (AWS) | Production | No | Yes | Large enterprises, companies using AWS. |
| Google GKE | Google Cloud | Production | No | Yes | Large enterprises, companies using Google Cloud. |
| Azure AKS | Microsoft Azure | Production | No | Yes | Enterprises, companies using Azure services. |
| OpenShift | Red Hat (IBM) | Production | Yes (for single node) | Yes | Enterprises needing integrated CI/CD, large companies in regulated industries. |
| Kind (Kubernetes in Docker) | Kubernetes Community (CNCF) | Development | Yes | No | Developers, CI/CD pipelines in tech companies. |
How I push customized Images to Docker Hub(Website)
Recently, I set up a Kafka environment using the base images from Confluent. After tweaking and customizing these images to fit my specific needs, I realized that these modified images should be pushed to Docker Hub so I can easily reuse them later or share them with others. I had 9 images in total, so here’s the process I followed.
Step 1: Log In to Docker Hub
The first thing I did was log in to Docker Hub using my Docker Hub username, dwdas9.
docker login
It asked for my Docker Hub username and password, and once I provided those, I was logged in.
Step 2: Find the Image Names
To push the images, I needed to know their names. I used the following command to list all the Docker images on my local machine:
docker images
This command gave me a list of all the images, including their names, tags, and IDs. I picked out the relevant images that I had customized.
Step 3: Tag the Images
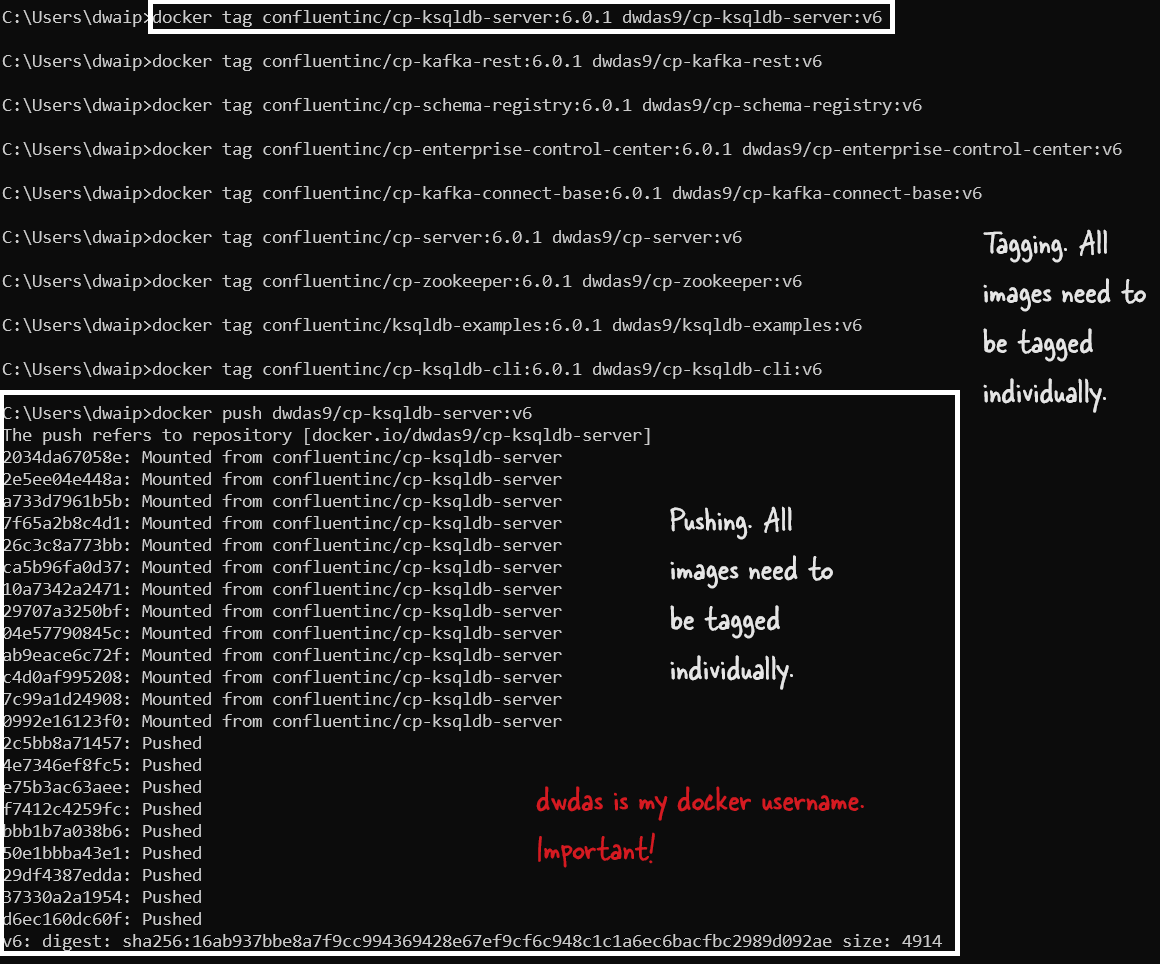
Before I could push the images, I had to tag them with my Docker Hub username and the repository name I wanted them to go into. Here’s how I did it for each of the 9 images:
docker tag confluentinc/cp-ksqldb-server:6.0.1 dwdas9/cp-ksqldb-server:v6
docker tag confluentinc/cp-kafka-rest:6.0.1 dwdas9/cp-kafka-rest:v6
docker tag confluentinc/cp-schema-registry:6.0.1 dwdas9/cp-schema-registry:v6
docker tag confluentinc/cp-enterprise-control-center:6.0.1 dwdas9/cp-enterprise-control-center:v6
docker tag confluentinc/cp-kafka-connect-base:6.0.1 dwdas9/cp-kafka-connect-base:v6
docker tag confluentinc/cp-server:6.0.1 dwdas9/cp-server:v6
docker tag confluentinc/cp-zookeeper:6.0.1 dwdas9/cp-zookeeper:v6
docker tag confluentinc/ksqldb-examples:6.0.1 dwdas9/ksqldb-examples:v6
docker tag confluentinc/cp-ksqldb-cli:6.0.1 dwdas9/cp-ksqldb-cli:v6
I replaced confluentinc with my username dwdas9 and added a custom tag v6 to each image.
Step 4: Push the Images to Docker Hub
With the images tagged, the next step was to push them to Docker Hub. I ran the following commands:
docker push dwdas9/cp-ksqldb-server:v6
docker push dwdas9/cp-kafka-rest:v6
docker push dwdas9/cp-schema-registry:v6
docker push dwdas9/cp-enterprise-control-center:v6
docker push dwdas9/cp-kafka-connect-base:v6
docker push dwdas9/cp-server:v6
docker push dwdas9/cp-zookeeper:v6
docker push dwdas9/ksqldb-examples:v6
docker push dwdas9/cp-ksqldb-cli:v6
Docker started uploading each image to the repository. Once the upload was complete, I could see all my modified images on Docker Hub under my account.
Conclusion
And that’s it! Now, my customized Kafka environment images are safely stored on Docker Hub, ready to be pulled down whenever I need them. If you’re working on something similar, these steps should help you push your images too.
Troubleshooting docker errors
If your Docker container is showing up as orange (in Docker Desktop) or failed to start without giving specific details, it means the container likely encountered an error during startup. Docker doesn’t always show detailed error messages in the UI, but you can retrieve more information using the following methods.
Steps to Debug the Issue
1. Check the Container Logs
You can check the logs for the failed container to see what went wrong. Run this command to inspect the container logs:
docker logs your-container-name
This will show you any errors or issues that occurred during the container’s initialization. Look for specific errors related to:
- Missing environment variables.
- Errors in Spark or system configuration.
- Issues with file mounting (e.g., mapping the
confdirectory).
2. Inspect the Container Status
You can inspect the container to get more information about why it failed. Use the docker inspect command:
docker inspect your-container-name
This will provide detailed information about the container’s configuration, including the exit code. Look for anything abnormal in the output, especially the State and ExitCode sections.
3. Check for File Permissions and Volume Issues
Sometimes, volume mapping can cause issues, especially when the local directory being mounted doesn’t have the correct permissions, or Docker has trouble accessing it.
Make sure that the local mapped-folder folder has the correct permissions for Docker to access it. For example:
- Check if the directory exists and has read/write permissions:
ls -ld mapped-folder
If the directory is not accessible by Docker, try giving it the correct permissions:
chmod -R 755 mapped-folder