Jupyter All-Spark Notebook: Complete Guide
What is Jupyter All-Spark Notebook?
Jupyter All-Spark Notebook is a pre-configured Docker image maintained by the Jupyter Project. It bundles Jupyter Lab, Python, and Apache Spark into a single, ready-to-run container—eliminating manual setup and dependency conflicts.
Who Offers It & Where to Find It
- Maintained by: Jupyter Project (open source)
- Available on: Docker Hub and Quay.io
- Official Images:
jupyter/all-spark-notebook(Docker Hub) - Version History: Available on Docker Hub with tags like
latest,ubuntu-22.04,x86_64-ubuntu-22.04, etc.
What's Inside & Key Features
- Jupyter Lab: Modern web-based notebook interface
- Python 3: With pandas, numpy, matplotlib, scikit-learn pre-installed
- Apache Spark: Full Spark distribution (Scala, PySpark, Spark SQL)
- R & Julia (optional): If using extended images
- Development Tools: Git, curl, wget, and other utilities
✓ Interactive notebook environment for immediate coding
✓ Single-node Spark processing (ideal for prototyping)
✓ Works locally on Windows, Mac, or Linux
✓ Persistent volume for saving notebooks
✓ No manual Spark or Java configuration needed
✗ Single-node processing only (not distributed)
✗ Limited to your machine's RAM and CPU
✗ No fault tolerance or high availability
✗ Not suitable for production workloads
This image is perfect for learning Spark, prototyping data pipelines, and local development without complex setup.
Alternatives
Focus: Lightweight, minimal Spark environment
Pros: Smaller image size, basic Spark setup
Cons: No Jupyter integration, requires separate notebook setup
Use case: If you only need Spark without notebook interface
Focus: Bare Spark distribution
Pros: Official releases, full control
Cons: Manual setup required, no notebook interface
Use case: Production deployments, cluster setups
Focus: Cloud-based Spark with notebooks
Pros: Full notebook experience, collaborative, cloud-native
Cons: Requires internet, limited free tier
Use case: Team collaboration, cloud workflows
Focus: Local, all-in-one notebook + Spark
Pros: Zero setup, works offline, great for learning
Cons: Single-node only
Use case: Learning, prototyping, local development
Quick Deploy: Latest Version
Use these scripts to get Jupyter All-Spark running with the latest image in seconds.
Save this as start-jupyter.bat. Double-click or run from Command Prompt. Browser opens to http://localhost:8888:
start-jupyter.bat
@echo off
setlocal enabledelayedexpansion

set CONTAINER_NAME=jupyter-allspark
set IMAGE_NAME=jupyter/all-spark-notebook
set PORT=8888
set NOTEBOOK_DIR=%USERPROFILE%\jupyter-notebooks

if not exist "!NOTEBOOK_DIR!" mkdir "!NOTEBOOK_DIR!"

docker ps | find "!CONTAINER_NAME!" >nul
if !errorlevel! equ 0 (
    echo Container already running at http://localhost:!PORT!
    start http://localhost:!PORT!
    exit /b 0
)

docker ps -a | find "!CONTAINER_NAME!" >nul
if !errorlevel! equ 0 (
    docker start !CONTAINER_NAME!
) else (
    echo Pulling latest image and starting container...
    docker run -d ^
        --name !CONTAINER_NAME! ^
        -p !PORT!:8888 ^
        -v "!NOTEBOOK_DIR!":/home/jovyan/work ^
        -e JUPYTER_ENABLE_LAB=yes ^
        !IMAGE_NAME!
)

timeout /t 5 /nobreak
start http://localhost:!PORT!
echo Get your token: docker logs !CONTAINER_NAME!
Save this as start-jupyter.sh. Run: chmod +x start-jupyter.sh && ./start-jupyter.sh. Browser opens to http://localhost:8888:
start-jupyter.sh
#!/bin/bash

CONTAINER_NAME="jupyter-allspark"
IMAGE_NAME="jupyter/all-spark-notebook"
PORT="8888"
NOTEBOOK_DIR="$HOME/jupyter-notebooks"

mkdir -p "$NOTEBOOK_DIR"

if docker ps | grep -q "$CONTAINER_NAME"; then
    echo "Container already running at http://localhost:$PORT"
    open "http://localhost:$PORT"
    exit 0
fi

if docker ps -a | grep -q "$CONTAINER_NAME"; then
    echo "Restarting existing container..."
    docker start "$CONTAINER_NAME"
else
    echo "Pulling latest image and starting container..."
    docker run -d \
        --name "$CONTAINER_NAME" \
        -p "$PORT:8888" \
        -v "$NOTEBOOK_DIR":/home/jovyan/work \
        -e JUPYTER_ENABLE_LAB=yes \
        "$IMAGE_NAME"
fi

sleep 5
open "http://localhost:$PORT"
echo "Get your token: docker logs $CONTAINER_NAME"
Advanced: Custom Network + Specific Version
Need to connect Jupyter to a custom Docker network (e.g., dasnet) and use a specific version? Use these scripts.
Finding Available Versions
Visit the Docker Hub page and look for tags like:
- latest — Current stable release
- ubuntu-22.04 — Latest on Ubuntu 22.04
- x86_64-ubuntu-22.04 — Specific architecture + OS combo
- <date> — Historical releases (e.g., 2024-01-15)
Example tag: jupyter/all-spark-notebook:x86_64-ubuntu-22.04
Save this as start-jupyter-custom.bat. Edit NETWORK_NAME and IMAGE_VERSION as needed. Double-click or run from Command Prompt:
start-jupyter-custom.bat
@echo off
setlocal enabledelayedexpansion

REM Customize these variables
set NETWORK_NAME=dasnet
set IMAGE_VERSION=x86_64-ubuntu-22.04
set CONTAINER_NAME=jupyter-spark

echo Starting Jupyter All-Spark on !NETWORK_NAME! network...

REM Create network if it doesn't exist
docker network inspect !NETWORK_NAME! >nul 2>&1
if !errorlevel! neq 0 (
    echo Creating !NETWORK_NAME! network...
    docker network create !NETWORK_NAME!
) else (
    echo !NETWORK_NAME! network already exists
)

REM Clean up old container
docker rm -f !CONTAINER_NAME! 2>nul

REM Start container
echo Running container with version !IMAGE_VERSION!...
docker run -it ^
  --name !CONTAINER_NAME! ^
  --network !NETWORK_NAME! ^
  -p 8888:8888 ^
  jupyter/all-spark-notebook:!IMAGE_VERSION!

pause
Save this as start-jupyter-custom.sh. Edit NETWORK_NAME and IMAGE_VERSION as needed. Run: chmod +x start-jupyter-custom.sh && ./start-jupyter-custom.sh:
start-jupyter-custom.sh
#!/bin/bash

# Customize these variables
NETWORK_NAME="dasnet"
IMAGE_VERSION="x86_64-ubuntu-22.04"
CONTAINER_NAME="jupyter-spark"

echo "Starting Jupyter All-Spark on $NETWORK_NAME network..."

# Create network if it doesn't exist
if ! docker network inspect "$NETWORK_NAME" &> /dev/null; then
    echo "Creating $NETWORK_NAME network..."
    docker network create "$NETWORK_NAME"
else
    echo "$NETWORK_NAME network already exists"
fi

# Clean up old container
docker rm -f "$CONTAINER_NAME" 2>/dev/null

# Start container
echo "Running container with version $IMAGE_VERSION..."
docker run -it \
  --name "$CONTAINER_NAME" \
  --network "$NETWORK_NAME" \
  -p 8888:8888 \
  "jupyter/all-spark-notebook:$IMAGE_VERSION"
Access Your Notebook
- Navigate to
http://localhost:8888in your browser - On first access, you'll need an authentication token
- Get your token from terminal output or run:
- Look for a URL like:
http://127.0.0.1:8888/lab?token=abc123... - Copy the token and paste into the login page
Use Jupyter All-Spark Notebook in VS Code
Prerequisites
- VS Code installed with the Jupyter extension
- Python extension for VS Code
- Jupyter container running (from Quick Deploy or Advanced section above)
Connect to Remote Jupyter Kernel
- Open Command Palette in VS Code (
Ctrl+Shift+P/Cmd+Shift+P) - Search for and select Jupyter: Specify local or remote Jupyter server for connections
- Choose Existing URI and enter:
http://localhost:8888 - Paste your authentication token when prompted
- Click Select another kernel → Jupyter Kernels → Choose the running kernel
Create & Run Notebooks
- Create a new file with
.ipynbextension or open an existing notebook - Select the remote Jupyter kernel from the kernel picker (top-right)
- Write and execute cells as normal—all processing happens in your Spark container
Key Benefits
✓ Full IDE features (IntelliSense, debugging, extensions)
✓ Seamless Spark integration with container isolation
✓ Work with large datasets without local resource drain
✓ Version control notebooks alongside your code
Troubleshooting
If connection fails:
- Verify container is running: docker ps
- Check logs for token: docker logs jupyter-allspark
- Ensure port 8888 is accessible: http://localhost:8888
- Try restarting the kernel from VS Code's kernel picker
Create Your First Notebook
- In Jupyter Lab, click File → New → Notebook
- Select Python 3 as kernel
- In the first cell, paste and run:
from pyspark.sql import SparkSession

spark = SparkSession.builder.appName("TestApp").getOrCreate()
print(f"Spark {spark.version} is running!")

# Simple example: create a dataset
data = [(1, "Alice"), (2, "Bob"), (3, "Charlie")]
df = spark.createDataFrame(data, ["id", "name"])
df.show()
Press Shift + Enter to execute.
Stop the Container
When done:
Your notebooks persist in ~/jupyter-notebooks (macOS) or C:\Users\YourUsername\jupyter-notebooks (Windows).
Architecture Overview
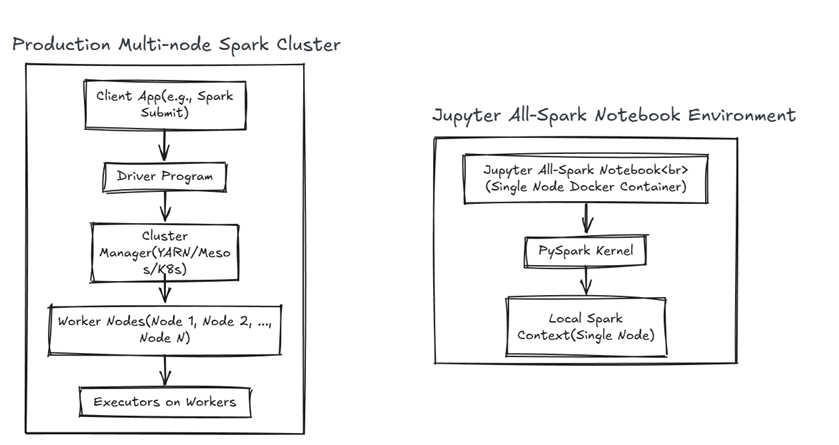
Single-Node vs. Multi-Node Architecture
Jupyter All-Spark (This Guide) runs Spark in standalone mode on a single machine: - Driver and executors run in one container - All processing uses local machine resources (RAM, CPU) - No network communication between nodes - Perfect for learning and prototyping
Real-World Multi-Node Spark Clusters distribute work across multiple machines: - Driver node: Receives tasks and coordinates job execution - Worker nodes: Execute tasks in parallel across different machines - Cluster Manager (YARN, Kubernetes, Mesos): Allocates resources and schedules work - Network layer: Nodes communicate via TCP/IP, shuffle data across network - Fault tolerance: If a node fails, work redistributes to other nodes - Scalability: Add more nodes to handle larger datasets and workloads
Key Differences:
| Aspect | Single-Node (This Guide) | Multi-Node Cluster |
|---|---|---|
| Processing | Sequential, limited by one machine | Parallel across many machines |
| Data | Fits in available RAM | Distributed partitions across nodes |
| Fault Tolerance | None; node failure = loss | Built-in; automatic redistribution |
| Network I/O | None | Significant data shuffling |
| Setup | Docker container, instant | Complex infrastructure (Kubernetes, cloud, etc.) |
| Use Case | Learning, prototyping | Production, big data analytics |