Create a Self-Hosted Agent in Docker Windows Container
You can run your Azure Pipeline agent in Windows, Windows Container, and Ubuntu Container.
This guide will show you how to set up your Azure Pipeline agent in a Windows Container.
Setup
We'll use a Windows laptop/desktop with Docker Desktop installed. First, we'll switch Docker Desktop to Windows Mode (it runs in Linux Mode by default) because the container will be a Windows OS.
Then we'll create the image, and the rest will be easy.
Install Docker for Windows
First, make sure Docker Desktop is installed on your Windows machine.
Switch Docker to Use Windows Containers
Note: Docker can run both Linux and Windows containers. By default, Docker runs in Linux mode. For more details, refer to this guide.
In PowerShell, run this command:
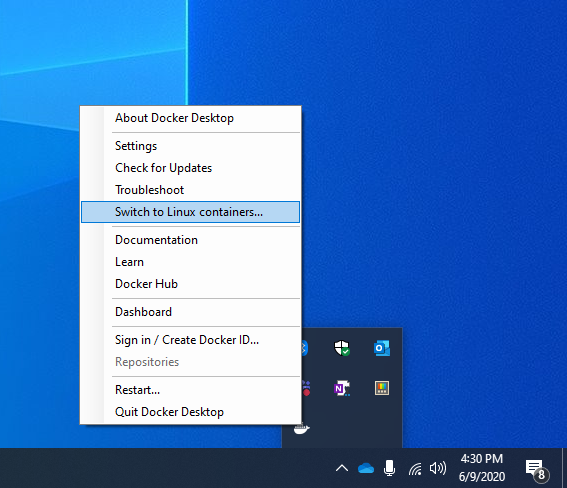
Note: If you have existing Linux containers, they will disappear when you switch to Windows mode but will return when you switch back to Linux mode. You will get a new Docker desktop!

To switch back to Linux mode later, refer to the image below:
Create and Build the Dockerfile
Next, create the Dockerfile.
Open a command prompt and create a new directory:
Save the following content to a file called C:\azp-agent-in-docker\azp-agent-windows.dockerfile:
FROM mcr.microsoft.com/windows/servercore:ltsc2022

WORKDIR /azp/

COPY ./start.ps1 ./

CMD powershell .\start.ps1
Save the following content to C:\azp-agent-in-docker\start.ps1:
Note, this script is taken as-is from this location.
function Print-Header ($header) {
  Write-Host "`n${header}`n" -ForegroundColor Cyan
}

if (-not (Test-Path Env:AZP_URL)) {
  Write-Error "error: missing AZP_URL environment variable"
  exit 1
}

if (-not (Test-Path Env:AZP_TOKEN_FILE)) {
  if (-not (Test-Path Env:AZP_TOKEN)) {
    Write-Error "error: missing AZP_TOKEN environment variable"
    exit 1
  }

  $Env:AZP_TOKEN_FILE = "\azp\.token"
  $Env:AZP_TOKEN | Out-File -FilePath $Env:AZP_TOKEN_FILE
}

Remove-Item Env:AZP_TOKEN

if ((Test-Path Env:AZP_WORK) -and -not (Test-Path $Env:AZP_WORK)) {
  New-Item $Env:AZP_WORK -ItemType directory | Out-Null
}

New-Item "\azp\agent" -ItemType directory | Out-Null

# Let the agent ignore the token env variables
$Env:VSO_AGENT_IGNORE = "AZP_TOKEN,AZP_TOKEN_FILE"

Set-Location agent

Print-Header "1. Determining matching Azure Pipelines agent..."

$base64AuthInfo = [Convert]::ToBase64String([Text.Encoding]::ASCII.GetBytes(":$(Get-Content ${Env:AZP_TOKEN_FILE})"))
$package = Invoke-RestMethod -Headers @{Authorization=("Basic $base64AuthInfo")} "$(${Env:AZP_URL})/_apis/distributedtask/packages/agent?platform=win-x64&`$top=1"
$packageUrl = $package[0].Value.downloadUrl

Write-Host $packageUrl

Print-Header "2. Downloading and installing Azure Pipelines agent..."

$wc = New-Object System.Net.WebClient
$wc.DownloadFile($packageUrl, "$(Get-Location)\agent.zip")

Expand-Archive -Path "agent.zip" -DestinationPath "\azp\agent"

try {
  Print-Header "3. Configuring Azure Pipelines agent..."

  .\config.cmd --unattended `
    --agent "$(if (Test-Path Env:AZP_AGENT_NAME) { ${Env:AZP_AGENT_NAME} } else { hostname })" `
    --url "$(${Env:AZP_URL})" `
    --auth PAT `
    --token "$(Get-Content ${Env:AZP_TOKEN_FILE})" `
    --pool "$(if (Test-Path Env:AZP_POOL) { ${Env:AZP_POOL} } else { 'Default' })" `
    --work "$(if (Test-Path Env:AZP_WORK) { ${Env:AZP_WORK} } else { '_work' })" `
    --replace

  Print-Header "4. Running Azure Pipelines agent..."

  .\run.cmd
} finally {
  Print-Header "Cleanup. Removing Azure Pipelines agent..."

  .\config.cmd remove --unattended `
    --auth PAT `
    --token "$(Get-Content ${Env:AZP_TOKEN_FILE})"
}
Build the Docker image:
The final image will be tagged as azp-agent:windows.
Start the Image
Now that you have created an image, you can run a container. This will install the latest version of the agent, configure it, and run the agent. It targets the specified agent pool (the Default agent pool by default) of a specified Azure DevOps or Azure DevOps Server instance of your choice: