Deploying MkDocs Material to GitHub Pages
This guide walks you through setting up an MkDocs site with Material theme and deploying it automatically to GitHub Pages using GitHub Actions.
Initial Setup
Start by creating a GitHub repository for your project, then clone it locally and open it in VS Code. Navigate to the repository folder in your terminal and create a Python virtual environment:
Install MkDocs Material along with the necessary extensions:
The mkdocs-material package is the main theme, while pymdown-extensions and mkdocs-glightbox add enhanced markdown features and image lightbox functionality.
Creating Your Site
Initialize a new MkDocs site in the current directory:
This creates a basic folder structure:
Open mkdocs.yml and configure the Material theme with your site details:
site_name: My Documentation
site_url: https://yourusername.github.io/your-repo
theme:
  name: material
Add your content by creating markdown files in the docs/ folder. Test your site locally with:
This launches a local server at http://127.0.0.1:8000 where you can preview changes in real-time.
Automated Deployment with GitHub Actions
To automatically deploy your site whenever you push changes, create a GitHub Actions workflow file at .github/workflows/ci.yml:
name: ci
on:
  push:
    branches:
      - master
      - main
permissions:
  contents: write
jobs:
  deploy:
    runs-on: ubuntu-latest
    steps:
      - uses: actions/checkout@v4
      - name: Configure Git Credentials
        run: |
          git config user.name github-actions[bot]
          git config user.email 41898282+github-actions[bot]@users.noreply.github.com
      - uses: actions/setup-python@v5
        with:
          python-version: 3.x
      - run: echo "cache_id=$(date --utc '+%V')" >> $GITHUB_ENV
      - uses: actions/cache@v4
        with:
          key: mkdocs-material-${{ env.cache_id }}
          path: .cache
          restore-keys: |
            mkdocs-material-
      - run: pip install mkdocs-material mkdocs-glightbox
      - run: mkdocs gh-deploy --force
This workflow triggers on every push to main or master, builds your site, and deploys it to the gh-pages branch. Before this works, you need to configure GitHub Pages in your repository settings.
Go to Settings → Pages and set the source to the gh-pages branch with /(root) as the folder. Don't select main/(root)—MkDocs Material generates the site in a separate gh-pages branch, not directly from your source files.
Once configured, push your changes and watch the Actions tab. After the workflow completes, your site will be live at https://yourusername.github.io/your-repo.
Troubleshooting: Missing Navigation
After deploying your MkDocs site, you might find that only the index page appears without any navigation menu. This common issue occurs when GitHub Pages is pointing to the wrong branch. Here's how the deployment process works and how to fix it.
Understanding the gh-pages Branch
When you push changes to your main branch, the GitHub Actions workflow automatically builds your MkDocs site and pushes the generated HTML files to a separate branch called gh-pages. This branch contains the final static website that GitHub Pages serves to visitors.
main branch:                          gh-pages branch:
 docs/           (Markdown)         index.html      (Built HTML)
 mkdocs.yml      (Config)           assets/         (CSS, JS, images)
 .github/        (Workflow)         ...             (Other static files)
The gh-pages branch is automatically managed by the mkdocs gh-deploy --force command in your workflow. You should never modify this branch directlylet GitHub Actions handle it.
The Fix
The solution is simple: configure GitHub Pages to use the gh-pages branch. Navigate to your repository's Settings → Pages and set:
- Source: "Deploy from a branch"
- Branch:
gh-pages - Folder:
/(root)
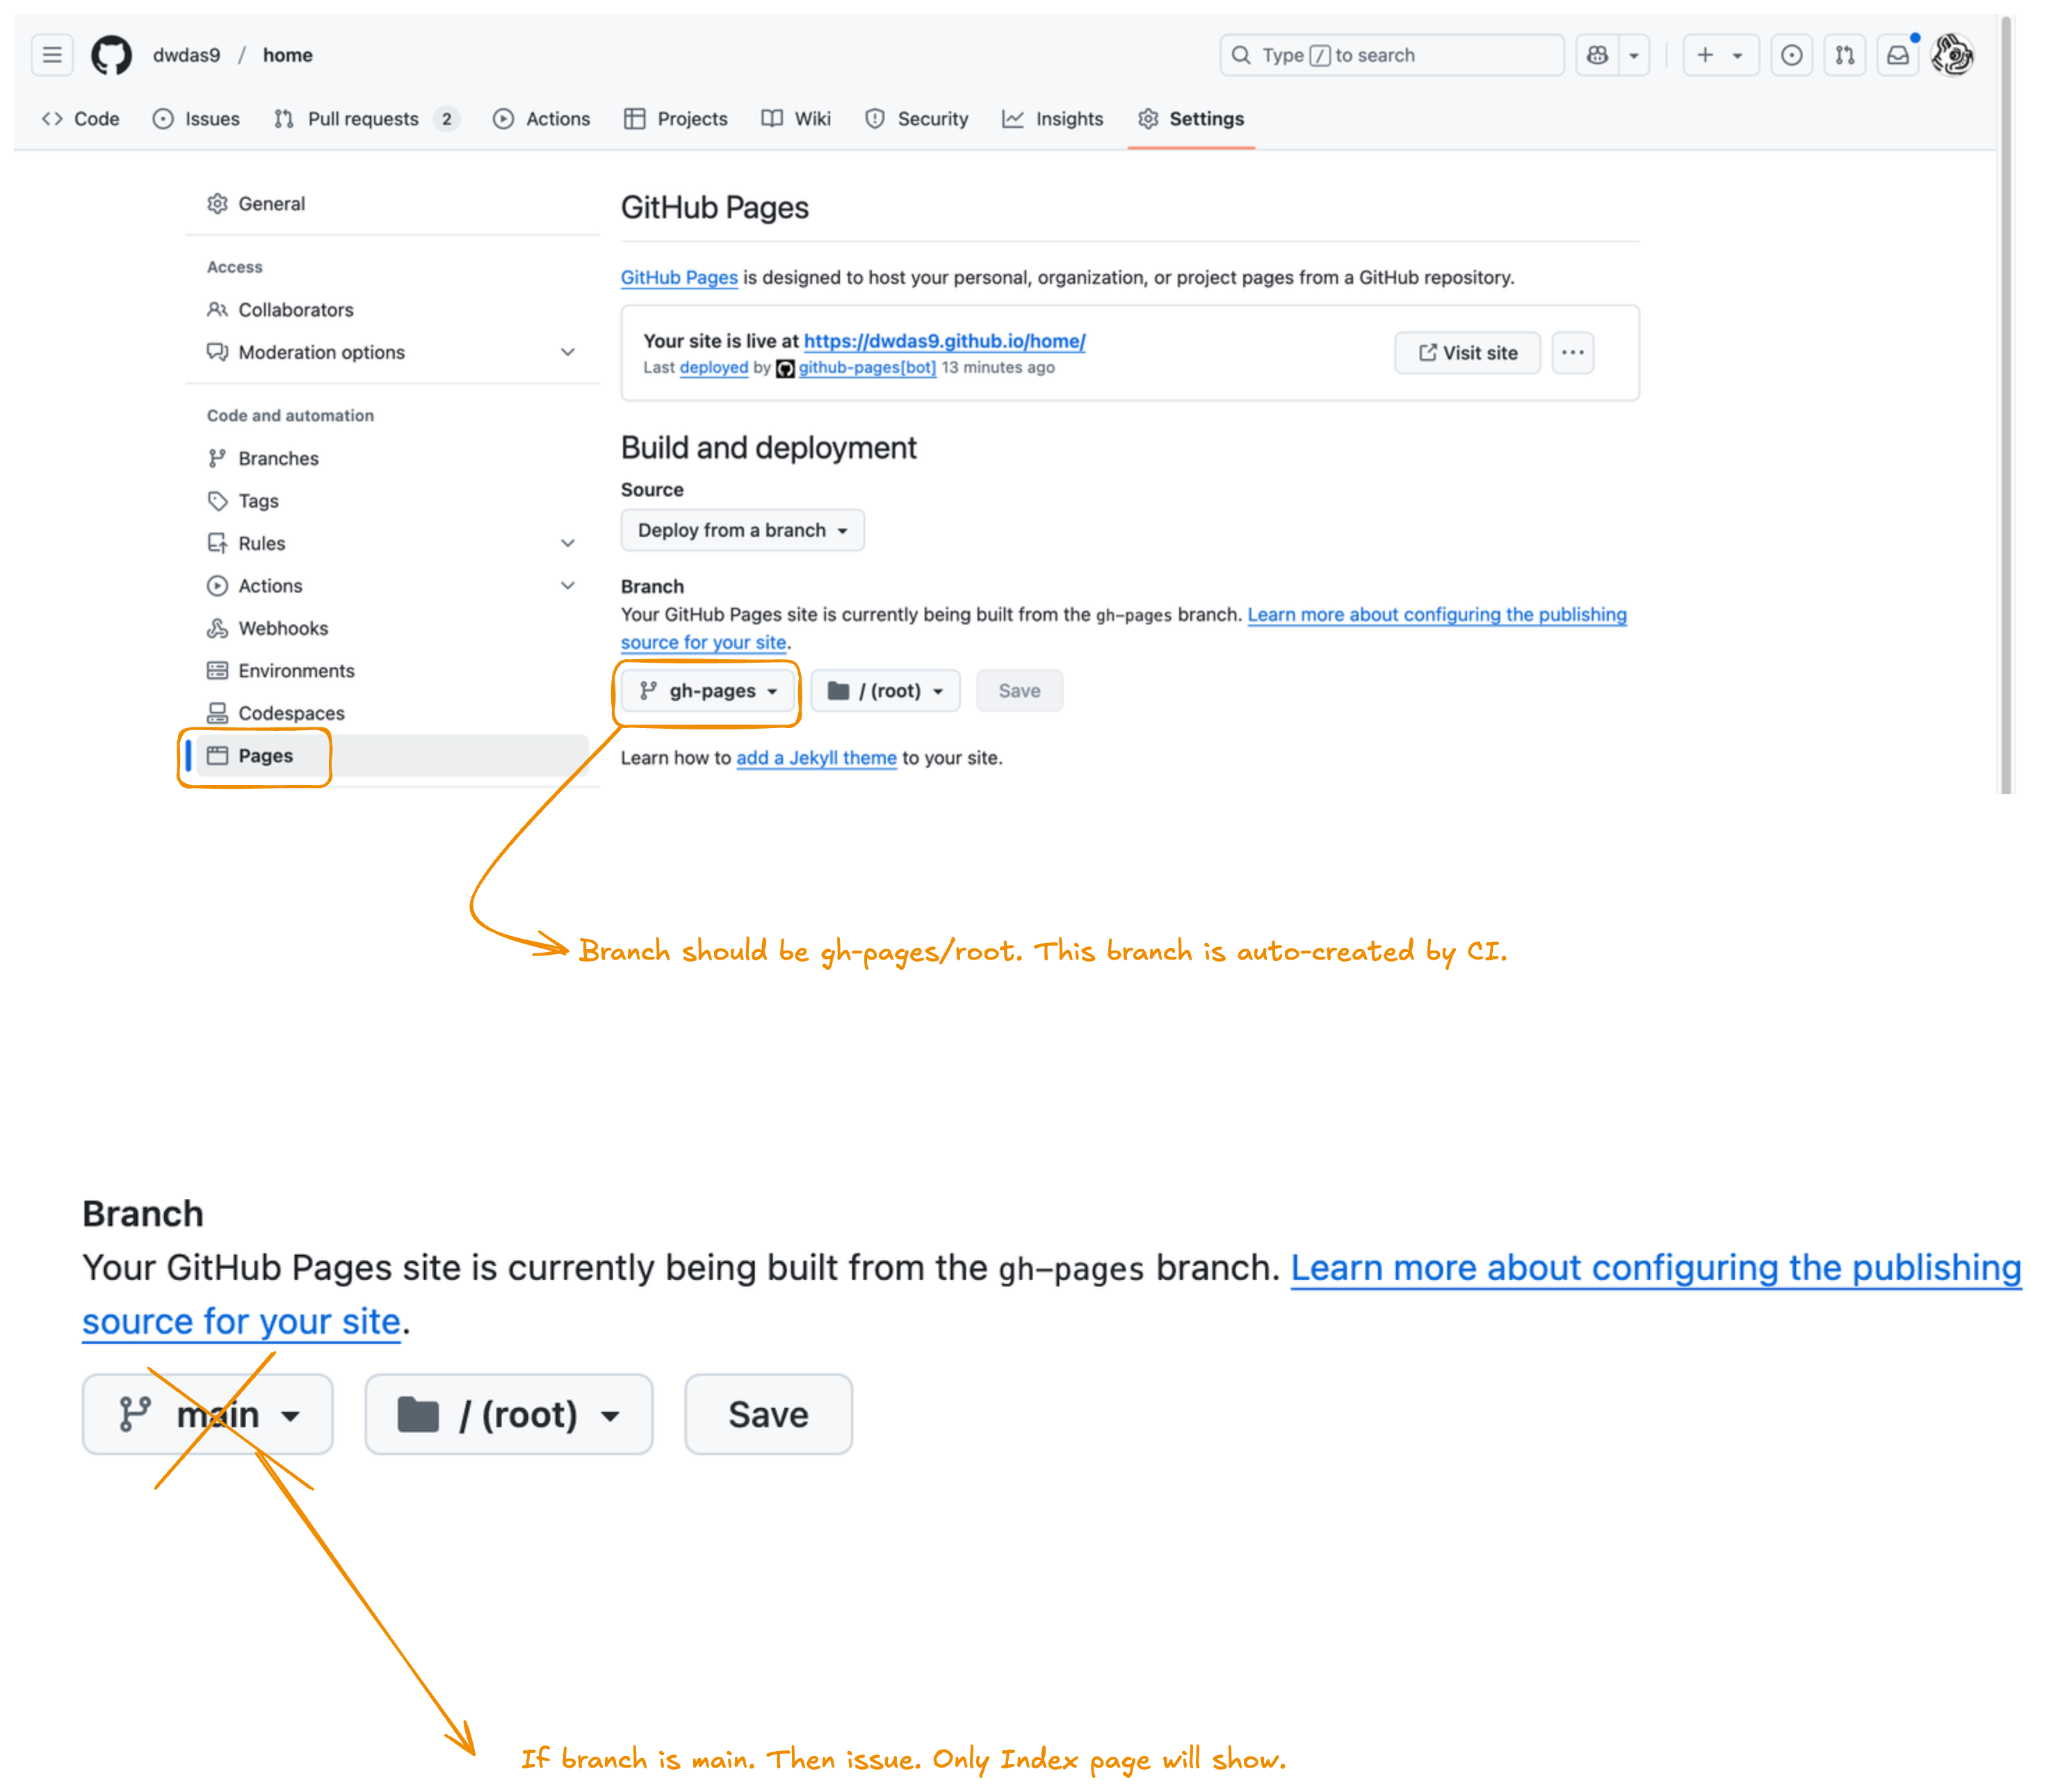
Important: Selecting
main/(root)won't work with MkDocs Material because the workflow builds to a different branch.
After changing this setting, trigger a rebuild to ensure everything deploys correctly:
Watch the Actions tab in GitHub for the workflow to complete, then visit your site at https://<username>.github.io/<repository>/. The navigation should now appear properly.
If GitHub Pages isn't configured correctly, you may also encounter this deployment error:

Error: Creating Pages deployment failed
Error: HttpError: Not Found
Error: Failed to create deployment (status: 404)
Ensure GitHub Pages has been enabled: https://github.com/<username>/<repository>/settings/pages
This 404 error means GitHub Actions can't deploy because the Pages service isn't enabled or the source branch isn't set. Go to Settings → Pages, ensure Source is set to "Deploy from a branch" with gh-pages/(root) selected, then re-run the workflow.
Best Practices
Keep your workflow simple: store all source content in main, let GitHub Actions build and deploy automatically, and never touch the gh-pages branch manually. If your site doesn't update after pushing changes, check the workflow logs in the Actions tab for any build errors.