Setup Airflow on Docker and create a simple dag
This article serves as your first step into the Airflow fold. Here, I'll walk you through creating a standalone Airflow container with all necessary components, and then guide you in setting up your first DAG.
Our envionrment will contain these components:
- A Windows laptop
- Docker Desktop installed
- Visual Studio Code
-
VS Code Remote Development pack - This lets you connect to the container and develop code locally.

Steps
1. Create the Airflow Container
Download Airflow Docker Image
Run the following command in your command prompt or power shell to pull the latest Airflow Docker image: docker pull apache/airflow:latest
Create a Docker Volume
Execute this command to create a Docker volume named airflow-volume for data persistence: docker volume create airflow-volume
Initialize Airflow Database
Initialize the Airflow database using the following two commands:
docker run --rm --network dasnet -v airflow-volume:/opt/airflow apache/airflow:latest users create --username airflow --firstname FIRST_NAME --lastname LAST_NAME --role Admin --email admin@example.com --password airflow
Note: I use a network dasnet. Hence --network part. You can totally remove the --network.
Start the Airflow Webserver
To start the Airflow webserver, use this command:
docker run -d --name airflow --network dasnet -p 8080:8080 -e AIRFLOW_UID=50000 -v airflow-volume:/opt/airflow apache/airflow:latest webserver
Note: I use a network
dasnet, which is why I added the--networkpart. You can skip the--networkif you don’t need it. Also, 8080 is a very common port. If it clashes with any other apps on your laptop, you can change it to something like 8084:8084 or any other random number that might not cause a conflict.
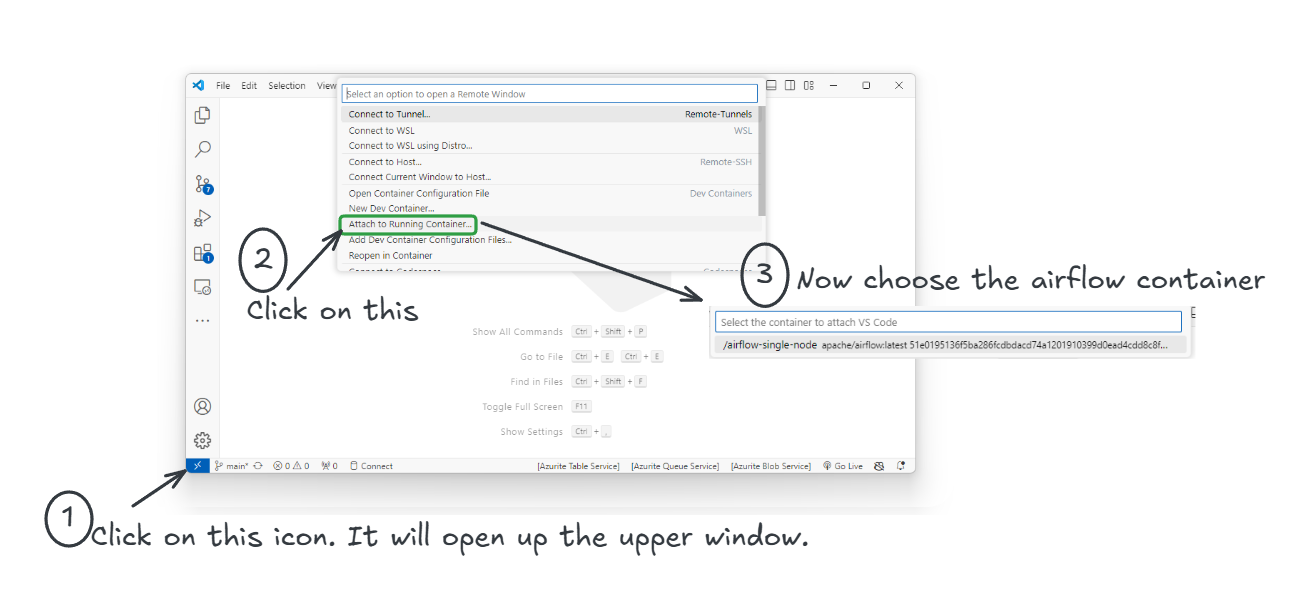
2. Connect to Your Container from VS Code
After creating the container, connect to it using Visual Studio Code:
- Open VS Code and click on the "Remote Explorer" icon on the left sidebar.
- Click on the Remote Development icon (usually in the bottom left corner).
-
Select the Airflow container from the list to connect.
3. Create our first dag - a hello_world.py Script
Now, let’s create your first DAG inside the container:
Note: For this example we are using a single-node Airflow container. As there is only one machine(container). The dags folder will be inside the /opt/airflow/dags inside the conatienr. Also, to make it simple we haven't mounted it anywhere on the local system.
- In VS Code, go to File > New File.
- Select Python as the file type.
- Go to the
/opt/airflow/dagsdirectory. -
Name the file
hello_world.py.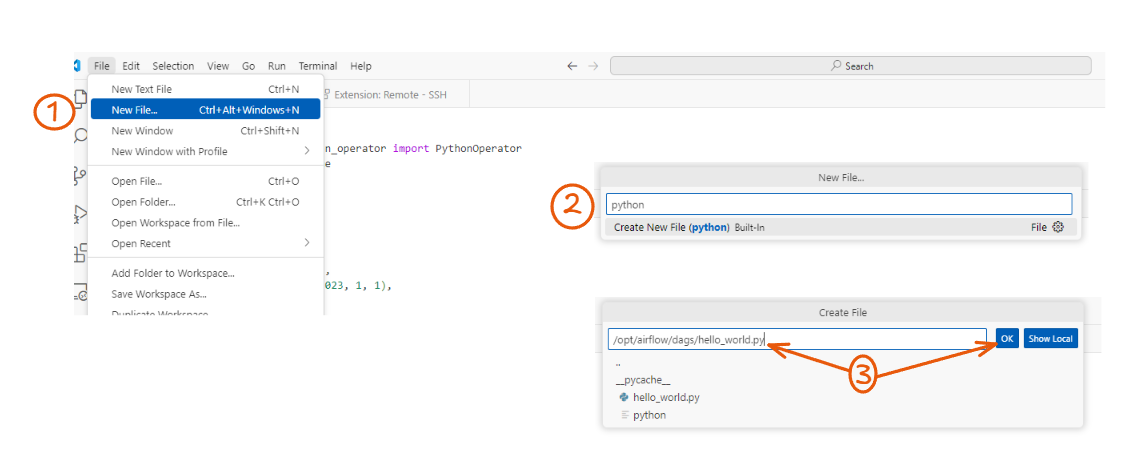
-
Paste the following code into the file and save it: ```python # Contact: das.d@hotmail.com
# Import necessary modules from Airflow and Python from airflow import DAG # All DAGs(.py files) MUST have this import. from airflow.operators.python import PythonOperator # Used to define tasks that run Python functions from datetime import datetime # This is always imported as you need to schedule the dag and it needs date and time
# Define a simple Python function that prints 'Hello World' # This function will be the task executed by the DAG def print_hello(): print('Hello World')
#This block, the DAG instance dag, is what makes this code an actual DAG. with DAG( 'hello_world', # Unique identifier for the DAG; should be descriptive start_date=datetime(2023, 1, 1), # The date when the DAG will start running; set to a past date for immediate start schedule_interval='@daily' # How often the DAG should run; '@daily' means it runs once a day ) as dag:
  # Define a task using PythonOperator
  # Any task defined inside the 'with' becomes part of the dag
  t1 = PythonOperator(
      task_id='print_hello',  # 'task_id' is a unique identifier for the task within the DAG
      python_callable=print_hello  # 'python_callable' is the function that the task will execute. The function to be executed when this task runs
  )
# The DAG and task are now defined # Airflow will take care of scheduling and running the task based on the DAG's schedule ```
4. Start the Airflow Scheduler
To run your DAG, you need to start the Airflow scheduler:
- Open the terminal in VS Code (which is already connected to the container).
- Run the following command:
hello_world DAG to run it according to the schedule you've set (daily in this case).
<img src="images/2024-08-29-00-18-11.png" alt="Description of the image" style="max-width: 100%; height: auto; border: 1px solid #ddd; border-radius: 4px; box-shadow: 0 4px 8px rgba(0, 0, 0, 0.1);">